> ## Documentation Index
> Fetch the complete documentation index at: https://docs.cube.dev/llms.txt
> Use this file to discover all available pages before exploring further.
# Google Workspace
> Walks Google Workspace super admins through SAML single sign-on between Google Admin and Cube Cloud.
Cube Cloud supports authenticating users through Google Workspace, which is
useful when you want your users to access Cube Cloud using single sign on. This
guide will walk you through the steps of configuring SAML authentication in Cube
Cloud with Google Workspace. You **must** be a super administrator in your
Google Workspace to access the Admin Console and create a SAML integration.
Available on [Enterprise plan](https://cube.dev/pricing).
## Enable SAML in Cube Cloud
First, we'll enable SAML authentication in Cube Cloud. To do this, log in to
Cube Cloud and
1. Click your username from the top-right corner, then click **Team &
Security**.
2. On the **Authentication & SSO** tab, ensure **SAML** is
enabled:
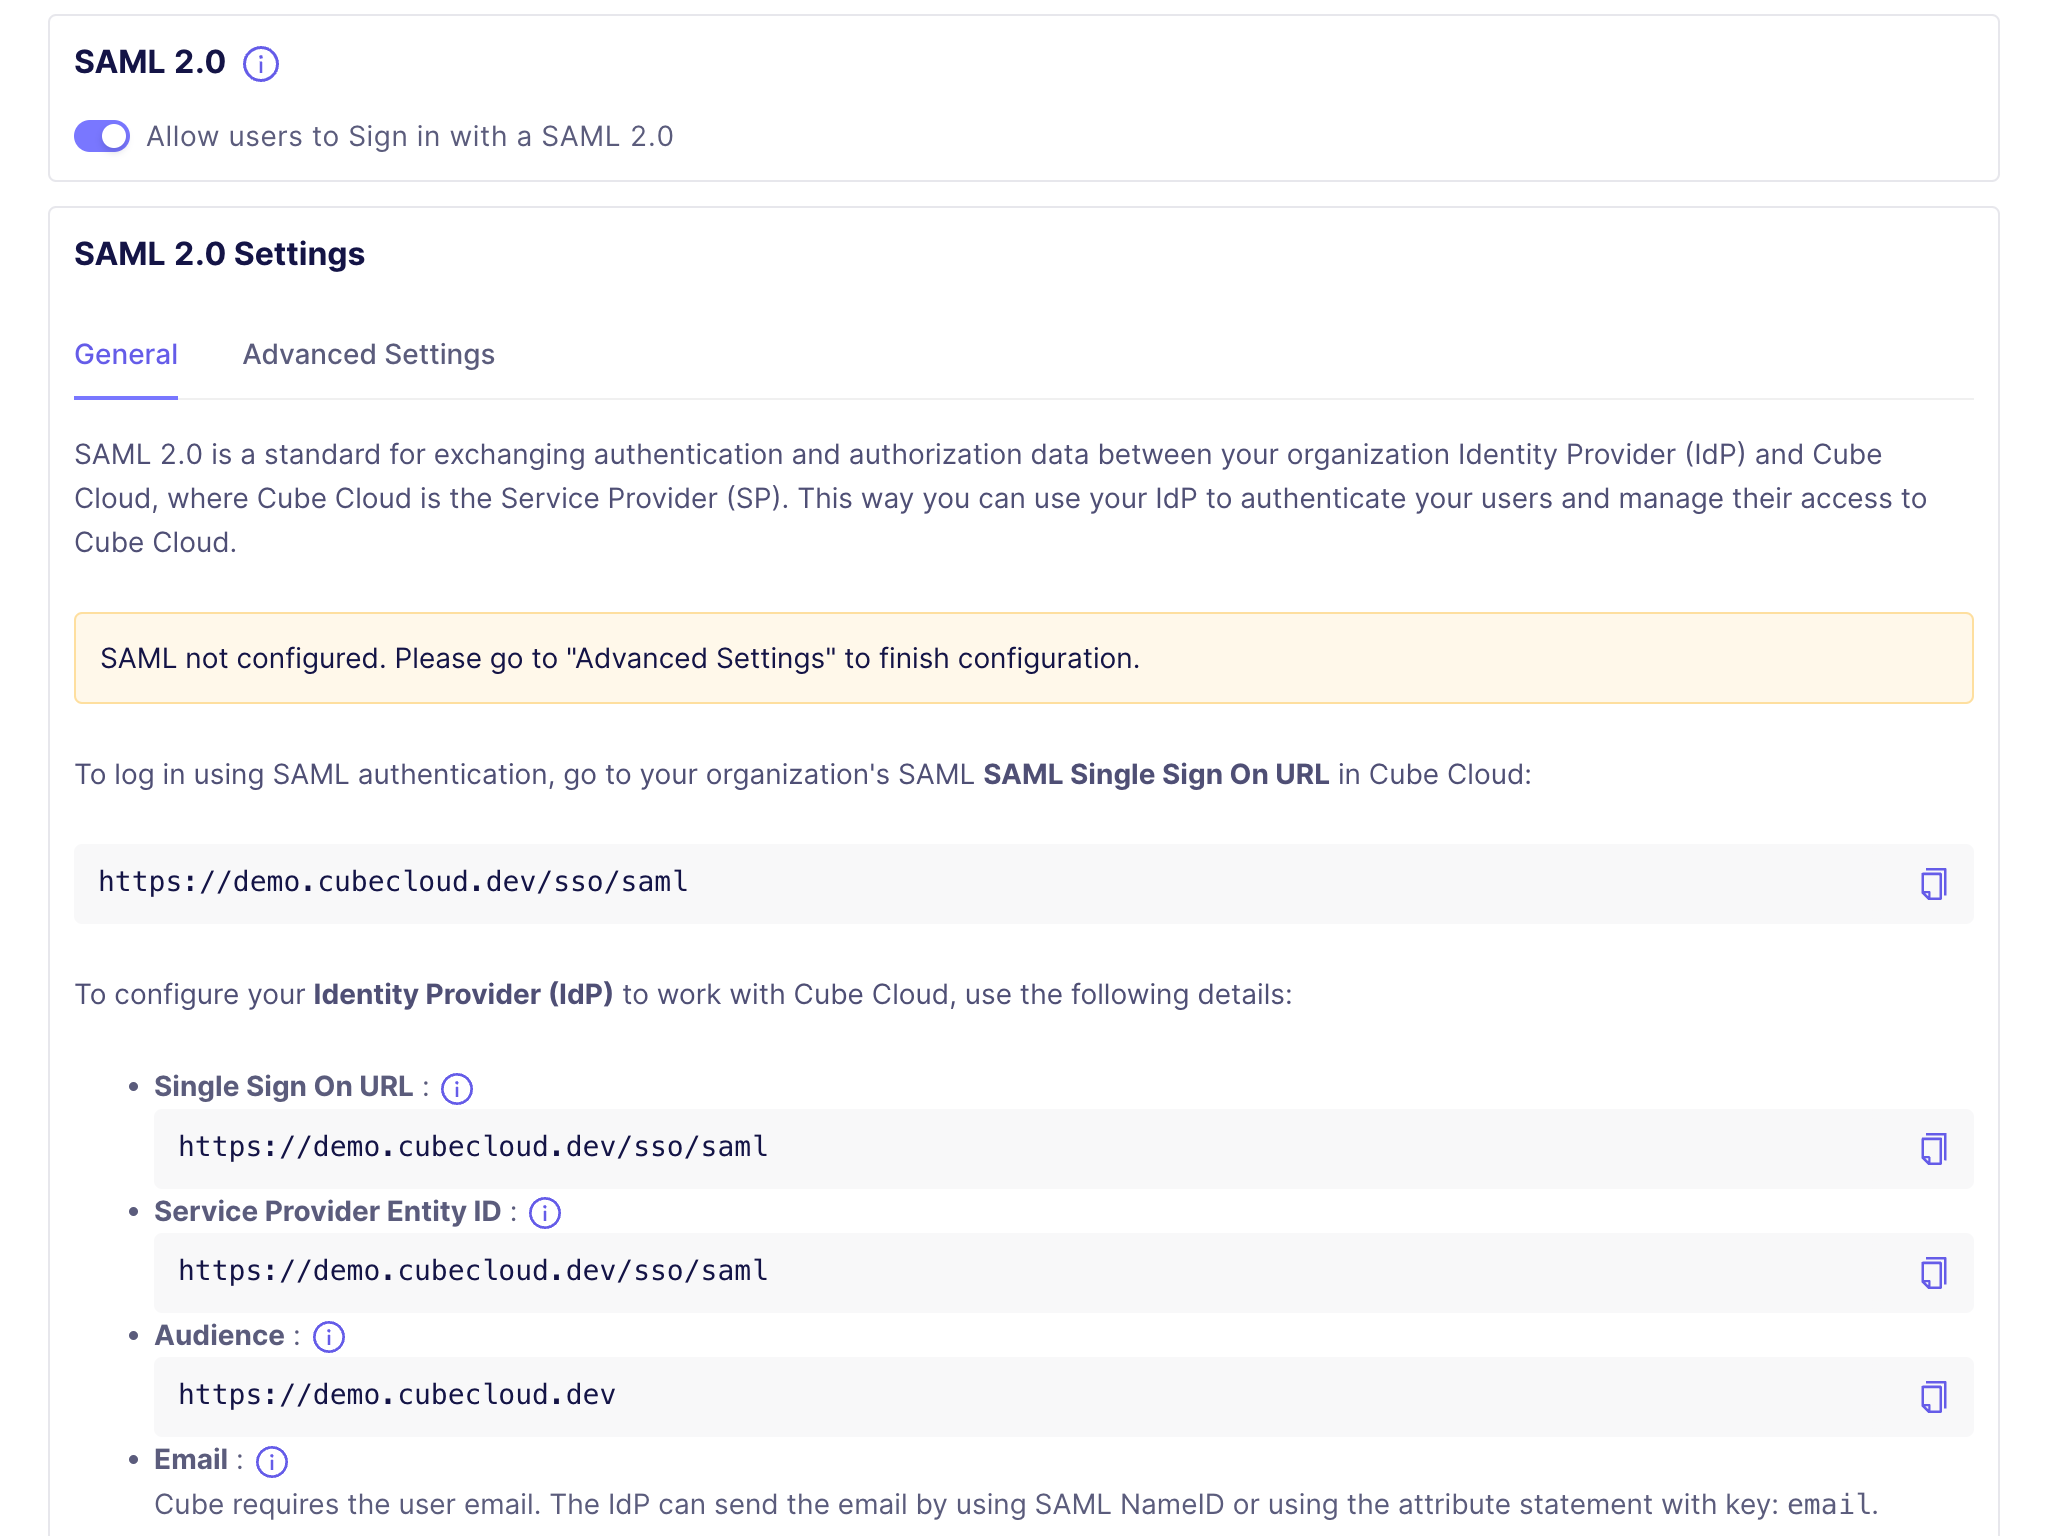 Take note of the **Single Sign On URL** and **Service Provider Entity
ID** values here, as we will need them in the next step when we configure
the SAML integration in Google Workspace.
## Create a SAML Integration in Google Workspace
Next, we'll create a [SAML app integration for Cube Cloud in Google
Workspace][google-docs-create-saml-app].
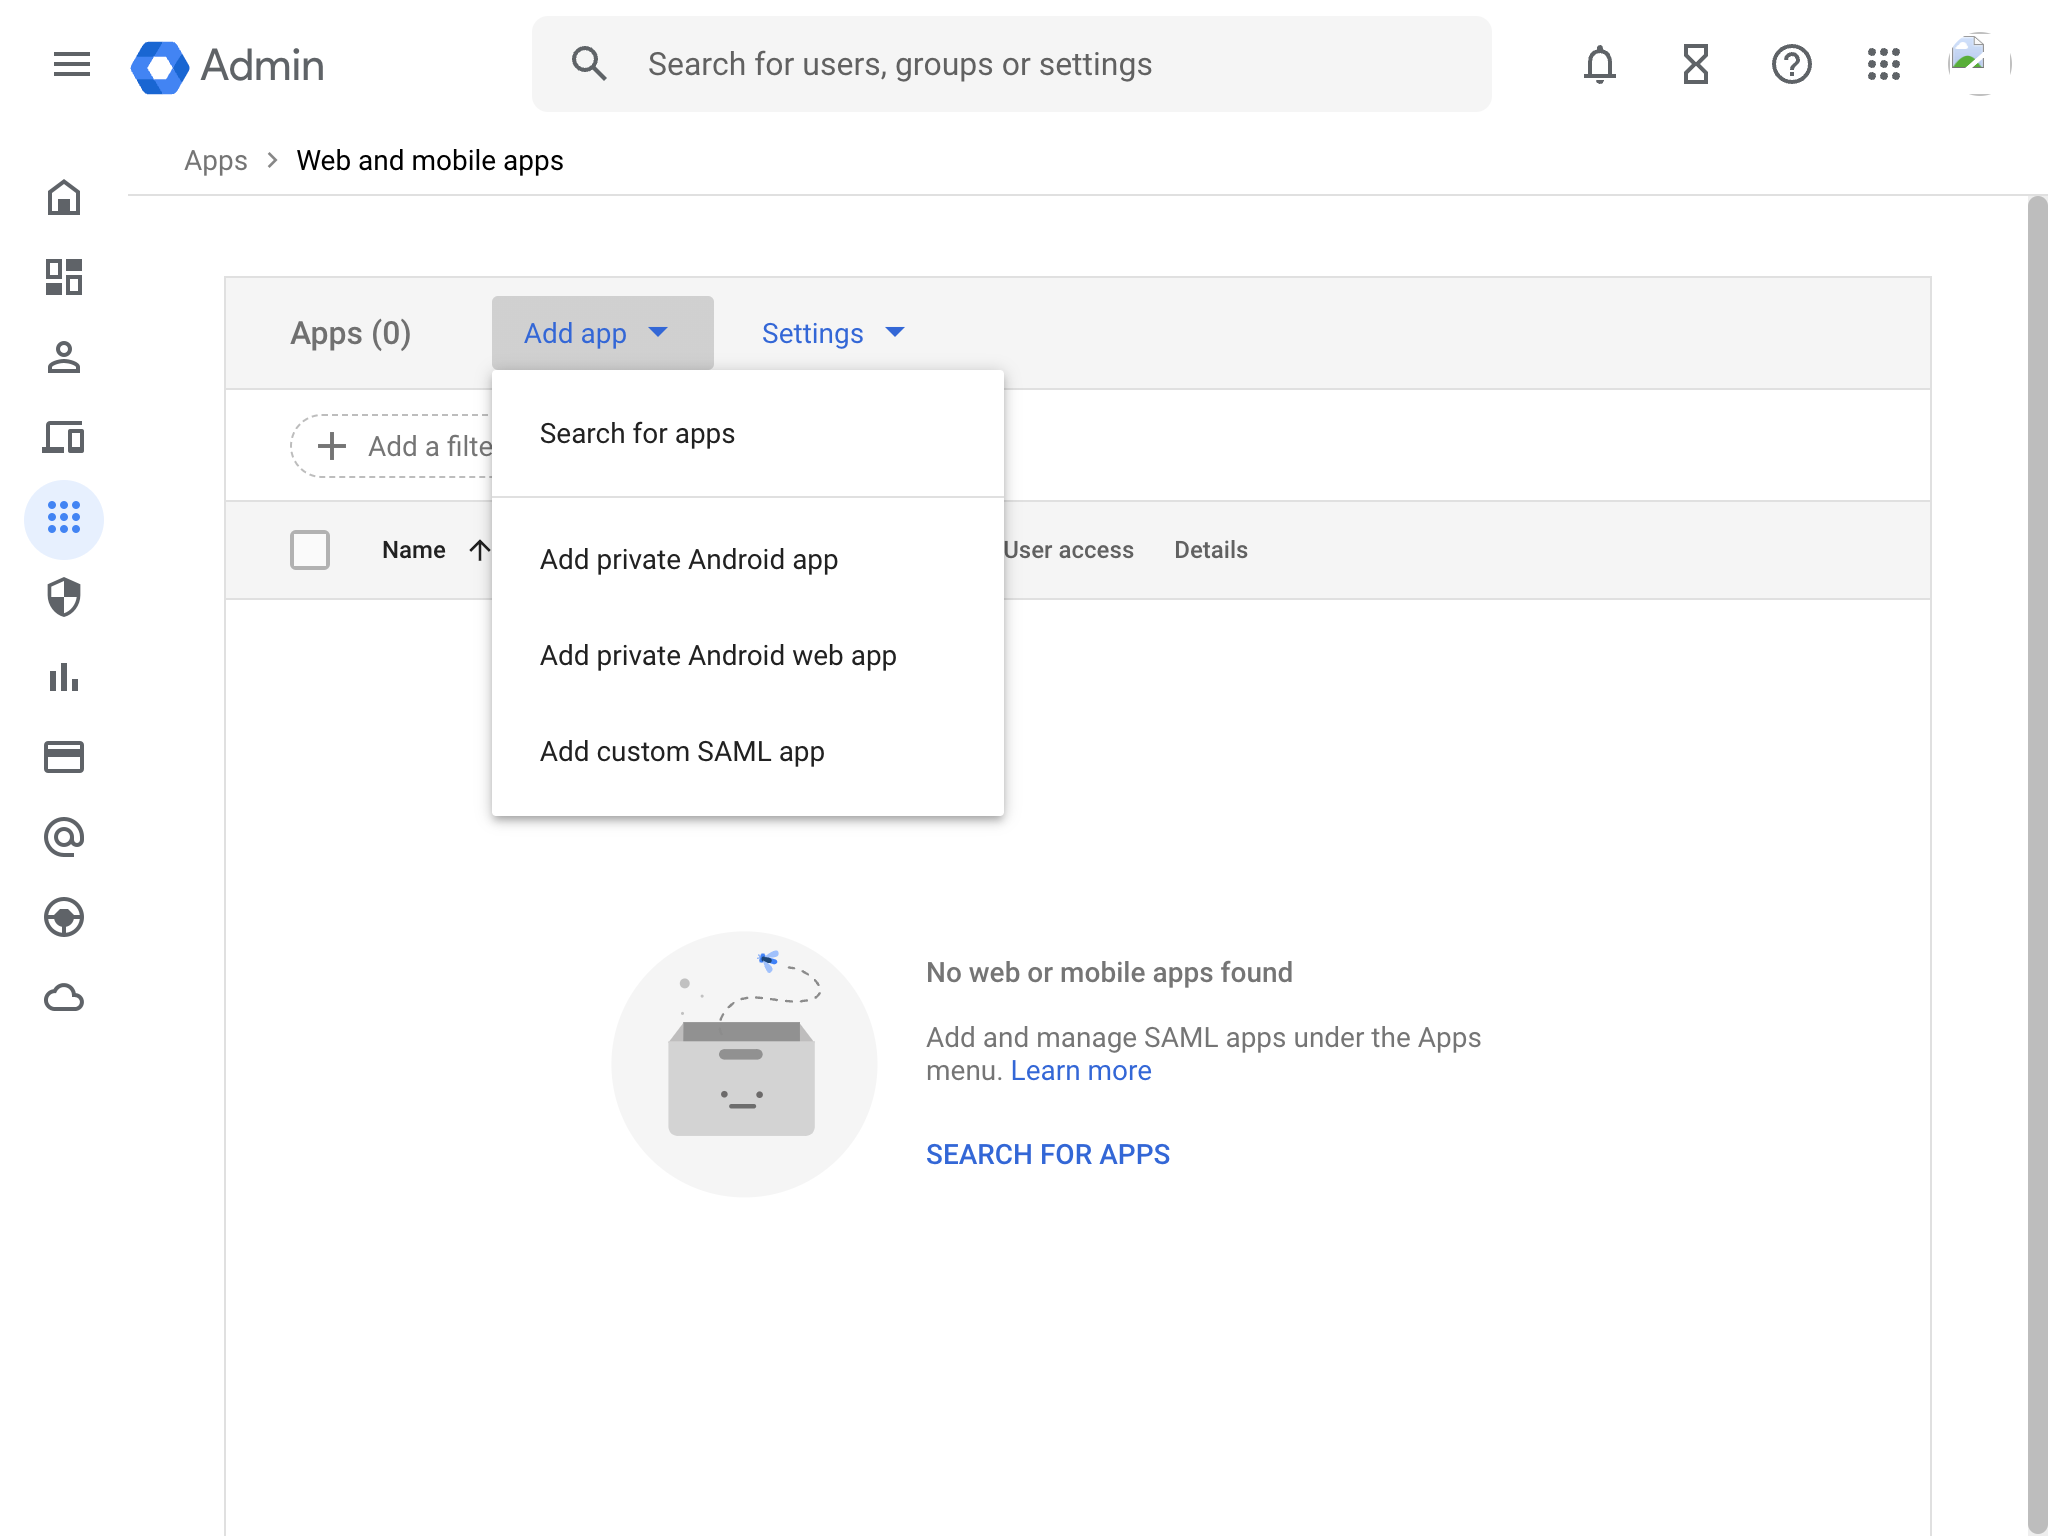
1. Log in to [admin.google.com](https://admin.google.com) as an administrator,
then navigate to
**Apps → Web and Mobile Apps** from the left sidebar.
2. Click **Add App**, then click **Add custom SAML app**:
Take note of the **Single Sign On URL** and **Service Provider Entity
ID** values here, as we will need them in the next step when we configure
the SAML integration in Google Workspace.
## Create a SAML Integration in Google Workspace
Next, we'll create a [SAML app integration for Cube Cloud in Google
Workspace][google-docs-create-saml-app].
1. Log in to [admin.google.com](https://admin.google.com) as an administrator,
then navigate to
**Apps → Web and Mobile Apps** from the left sidebar.
2. Click **Add App**, then click **Add custom SAML app**:
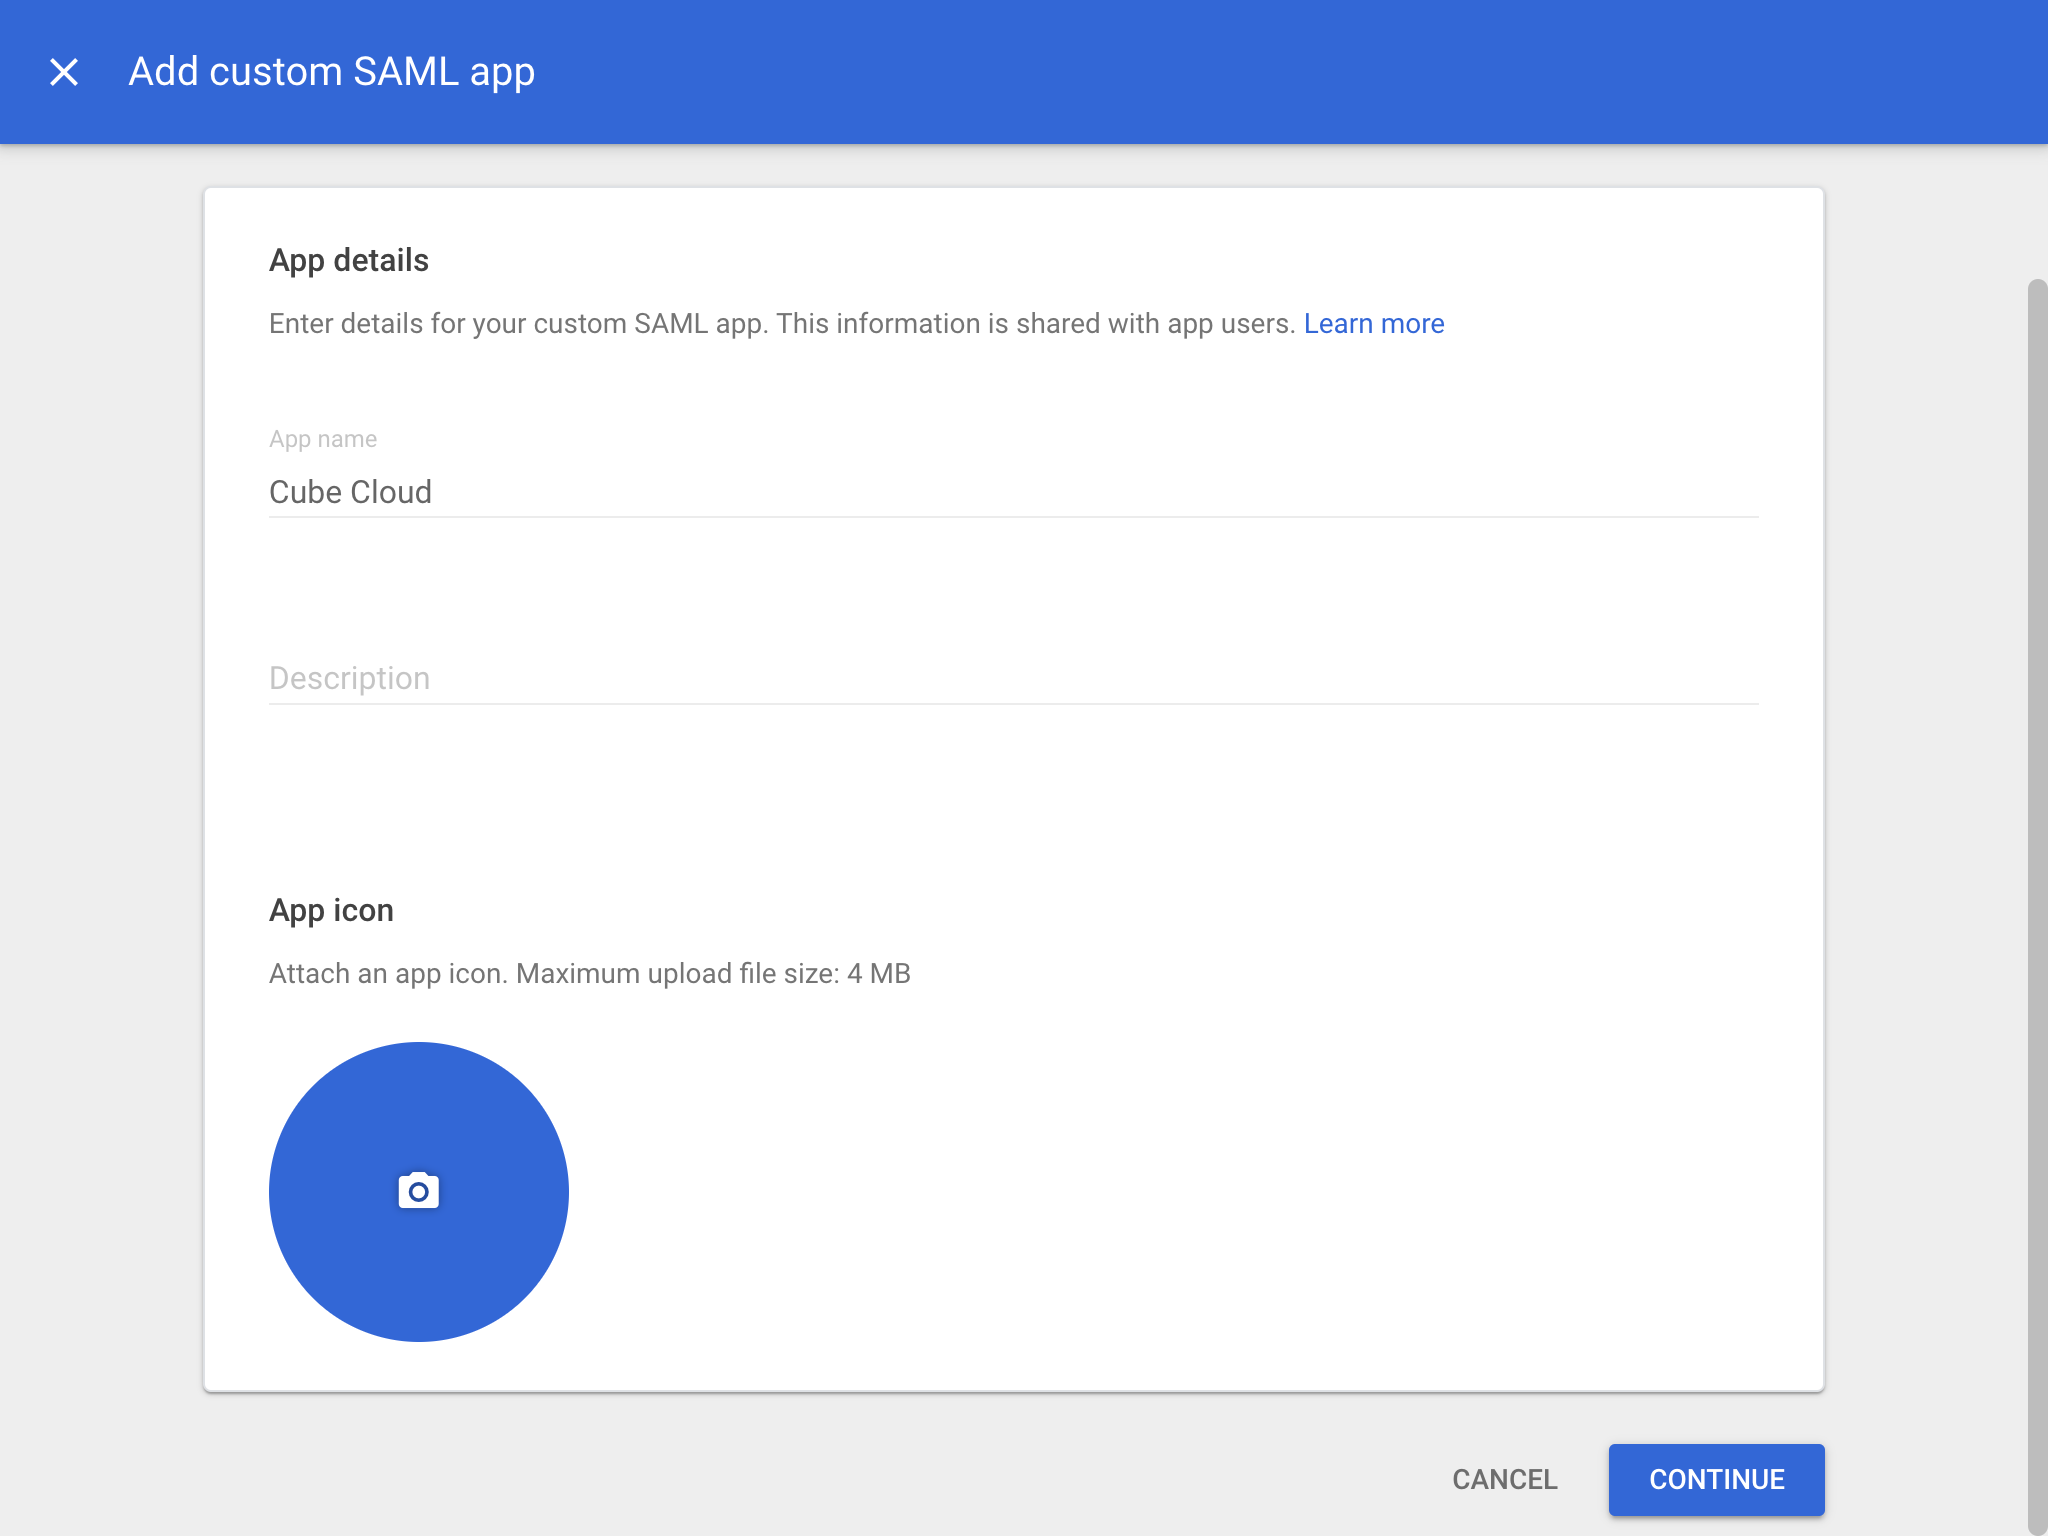
 3. Enter a name for your application and click **Next**. You can
optionally add a description and upload a logo for the application, but this
is not required. Click **Continue** to go to the next screen.
3. Enter a name for your application and click **Next**. You can
optionally add a description and upload a logo for the application, but this
is not required. Click **Continue** to go to the next screen.
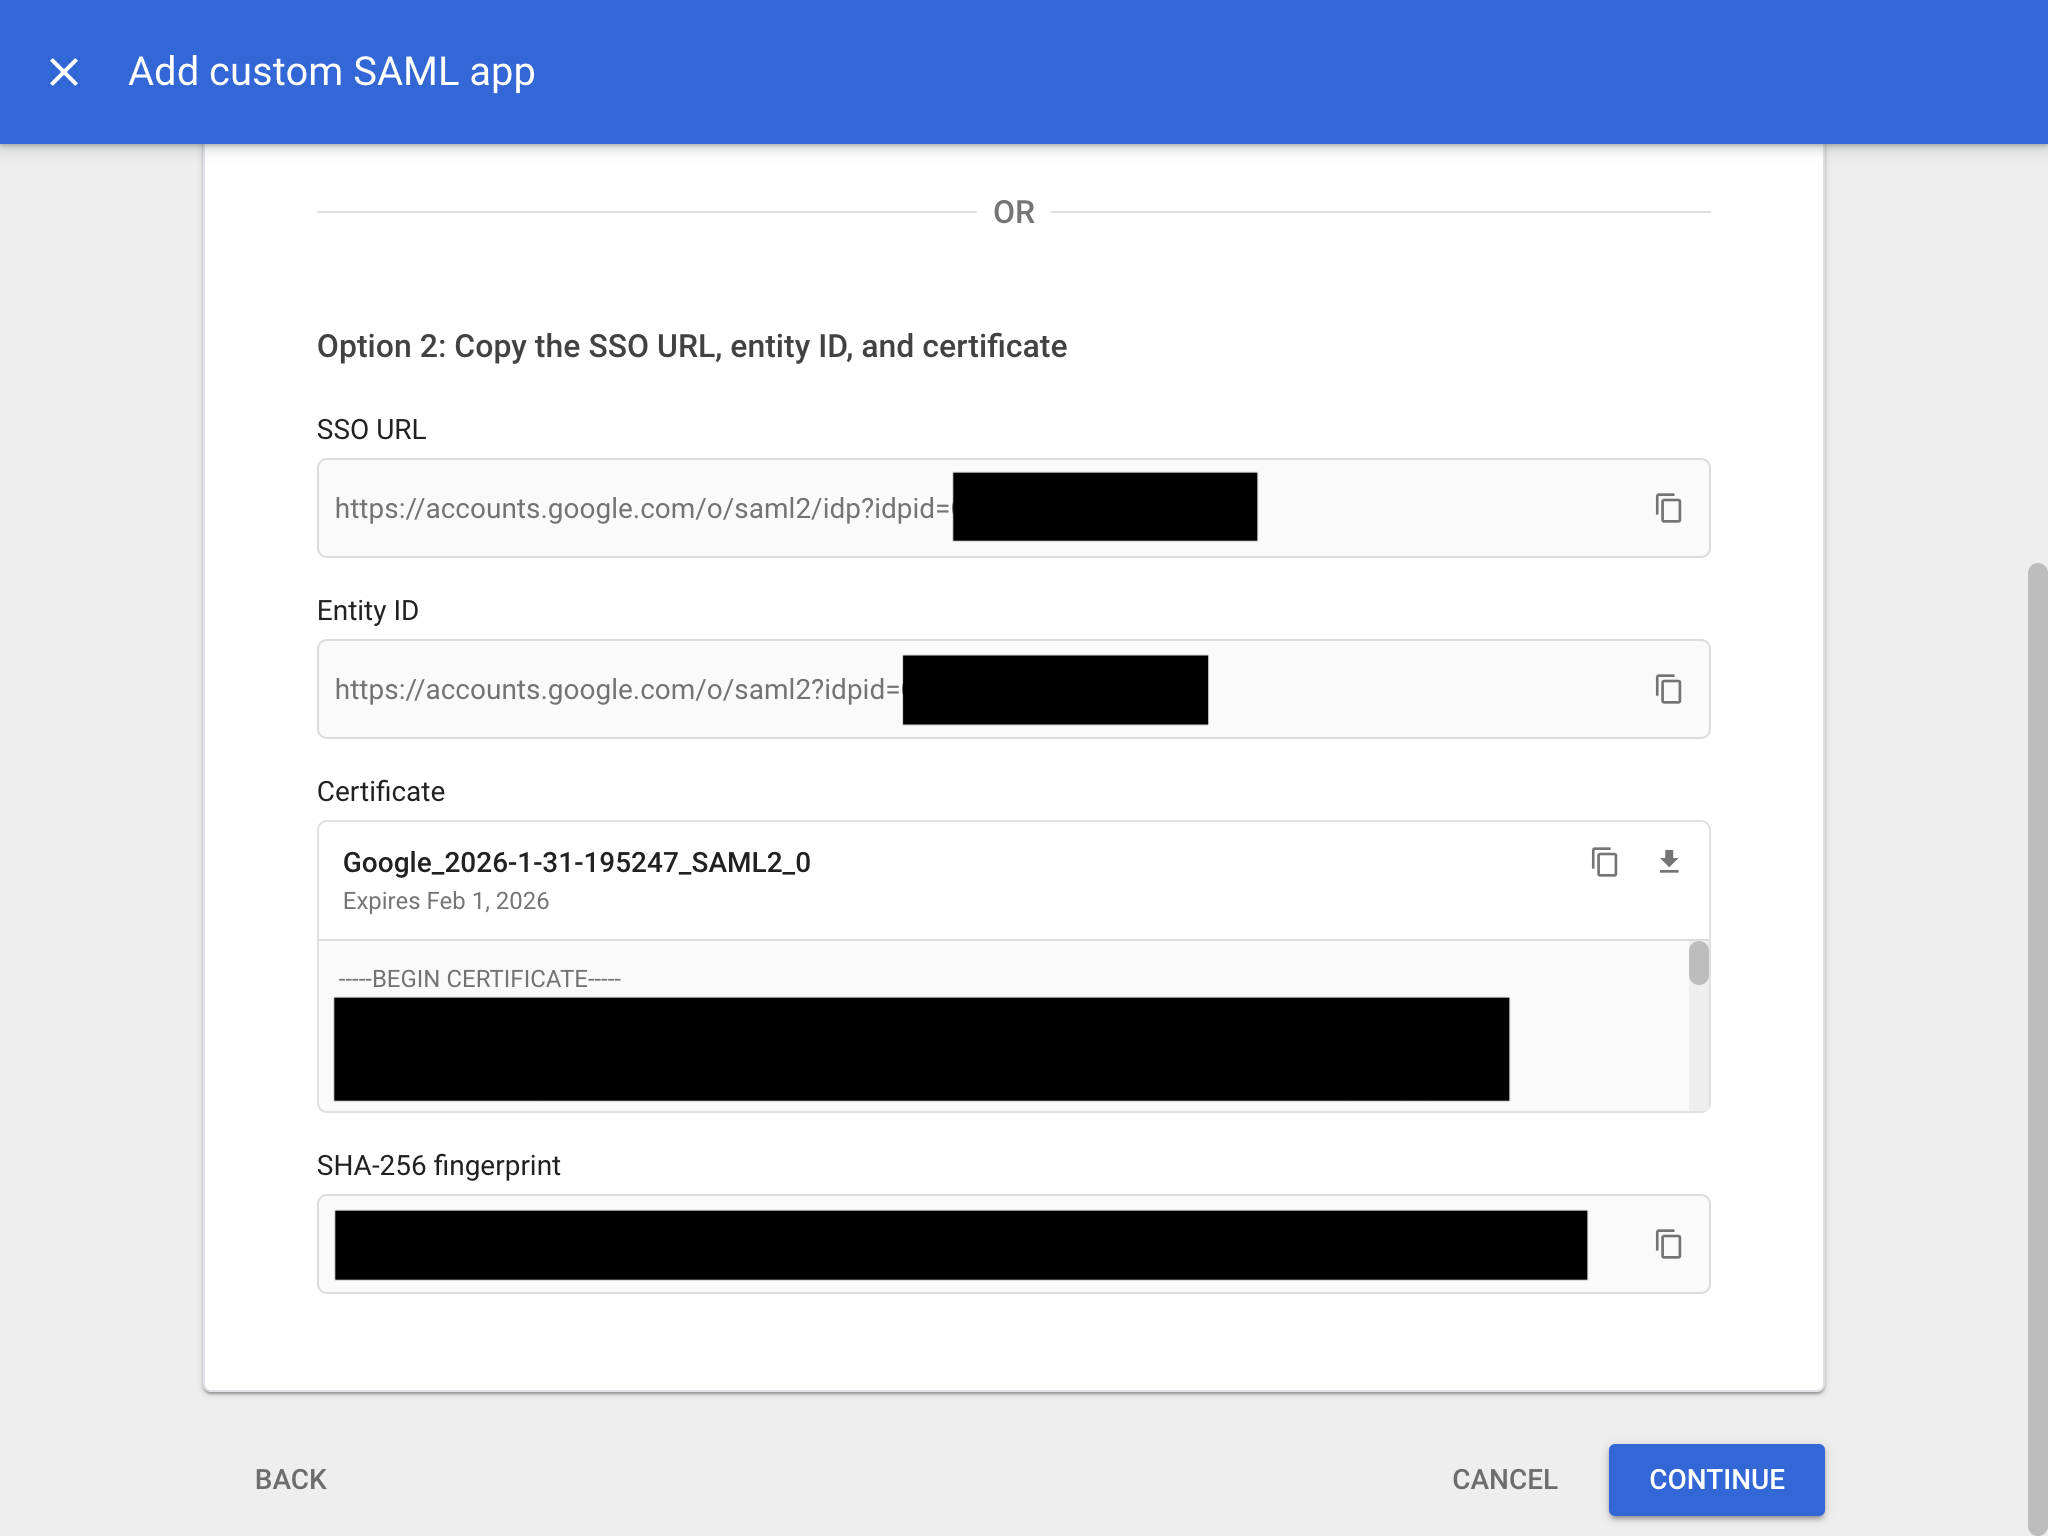
 4. Take note of the **SSO URL**, **Entity ID** and
**Certificate** values here, as we will need them when we finalize the
SAML integration in Cube Cloud. Click **Continue** to go to the next screen.
4. Take note of the **SSO URL**, **Entity ID** and
**Certificate** values here, as we will need them when we finalize the
SAML integration in Cube Cloud. Click **Continue** to go to the next screen.
 5. Enter the following values for the **Service provider details**
section and click **Continue**.
| Name | Description |
| --------- | ------------------------------------------------------------ |
| ACS URL | Use the **Single Sign On URL** value from Cube Cloud |
| Entity ID | Use the **Service Provider Entity ID** value from Cube Cloud |
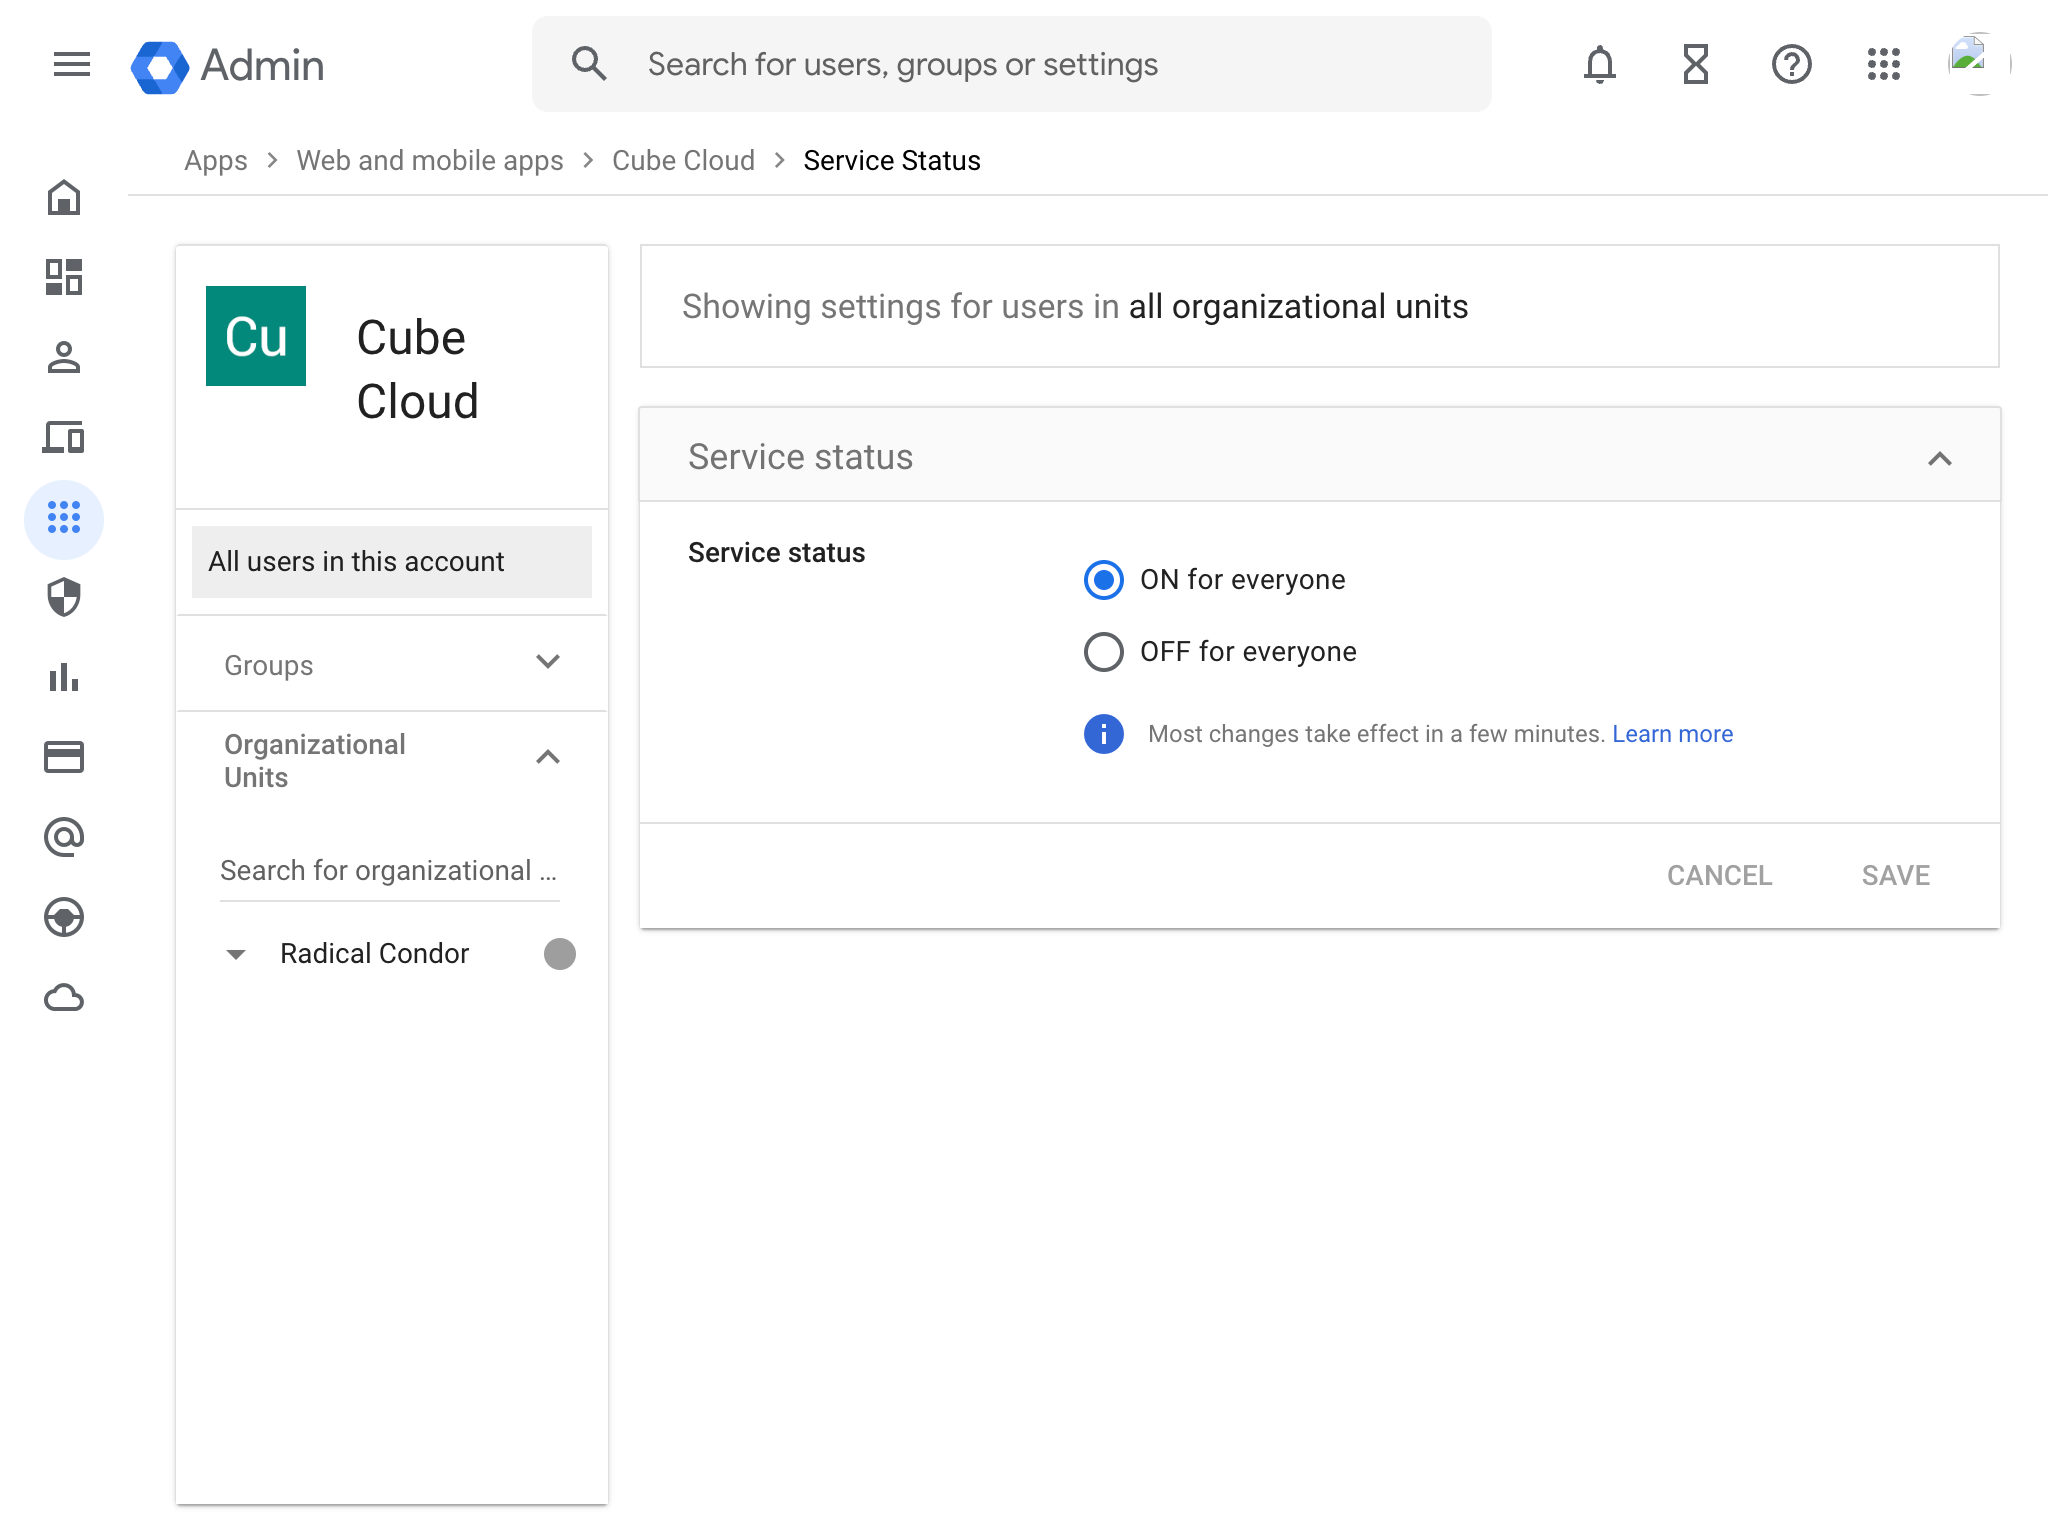
5. On the final screen, click **Finish**.
6. From the app details page, click **User access** and ensure the app is
**ON for everyone**:
5. Enter the following values for the **Service provider details**
section and click **Continue**.
| Name | Description |
| --------- | ------------------------------------------------------------ |
| ACS URL | Use the **Single Sign On URL** value from Cube Cloud |
| Entity ID | Use the **Service Provider Entity ID** value from Cube Cloud |
5. On the final screen, click **Finish**.
6. From the app details page, click **User access** and ensure the app is
**ON for everyone**:
 ## Enable SAML in Cube Cloud
In this step, we'll finalise the configuration by entering the values from our
SAML integration in Google into Cube Cloud.
1. From the same **Authentication & SSO > SAML** tab, click the
**Advanced Settings** tab:
## Enable SAML in Cube Cloud
In this step, we'll finalise the configuration by entering the values from our
SAML integration in Google into Cube Cloud.
1. From the same **Authentication & SSO > SAML** tab, click the
**Advanced Settings** tab:
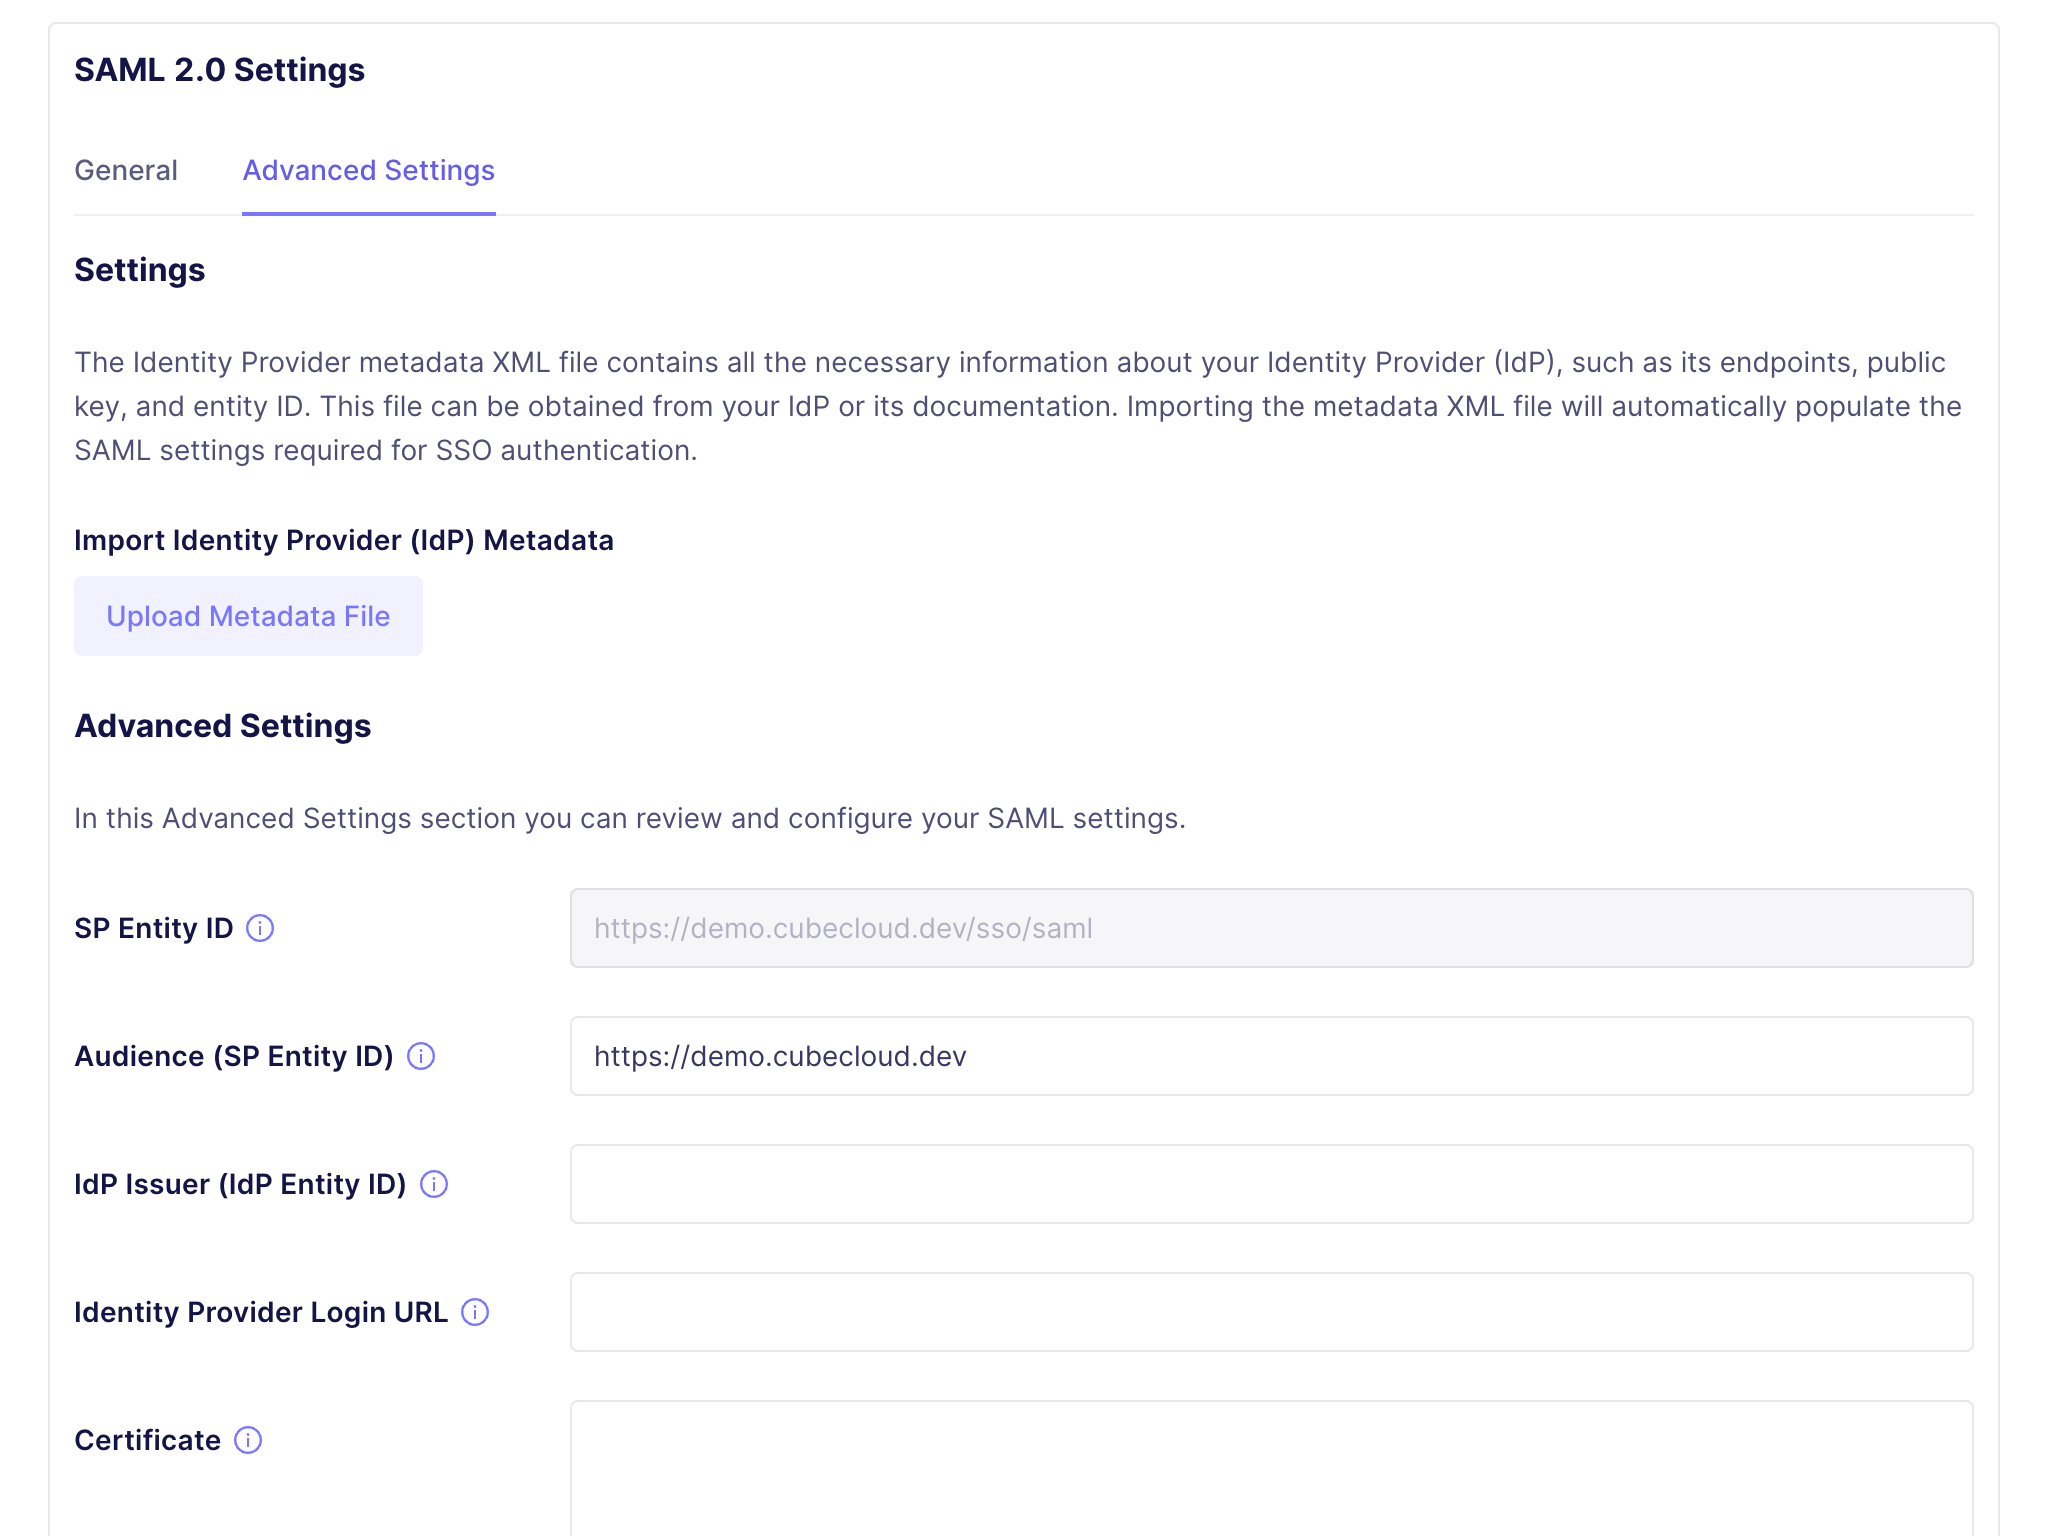 2. Enter the following values in the **SAML Settings** section:
| Name | Description |
| --------------------------- | ----------------------------------------------------------- |
| Audience (SP Entity ID) | Delete the prefilled value and leave empty |
| IdP Issuer (IdP Entity ID) | Use the **Issuer** value from Google Workspace |
| Identity Provider Login URL | Use the **Sign on URL** value from Google Workspace |
| Certificate | Use the **Signing Certificate** value from Google Workspace |
3. Enable **Auto-provision new users** if you want users to be automatically
created in Cube on their first login via this SAML provider. New users
are assigned the Viewer role by default — see
[Default role for new users](#default-role-for-new-users) to choose a
different role. Enable this if you are not using SCIM provisioning.
4. Scroll down and click **Save SAML Settings** to save the changes.
## Default role for new users
By default, users auto-provisioned via SAML receive the **Viewer** role.
To assign a different role, expand the **Advanced** section of the SAML
configuration form and pick from **Default role for new users**:
* **Developer**, **Explorer**, or **Viewer** — Cube Cloud's [default
roles][ref-roles].
* Any [custom role][ref-custom-roles] defined in your account, listed
below the divider.
The selected role applies **only when a user is first created**. Existing
users are not modified on subsequent SSO logins. It is applied **in
addition to** any roles your identity provider sends via the role
attribute (subject to the `rolesMap`).
Admin status is not assignable through this picker — Admin is controlled
separately. To grant admin permissions, update the user's role manually
under [Admin → Users][ref-manage-users].
If the selected role is later renamed or deleted, new users will fall
back to the **Viewer** role until you pick a valid role here. The Viewer
fallback applies whenever the configured default cannot be resolved —
whether that's because no default is set or the configured role no longer
exists.
## Test SAML authentication
To start using SAML authentication, use the
[single sign-on URL provided by Cube Cloud](#enable-saml-in-cube-cloud)
(typically `/sso/saml`) to log in to Cube Cloud.
[google-docs-create-saml-app]: https://support.google.com/a/answer/6087519?hl=en
[ref-roles]: /admin/users-and-permissions/roles-and-permissions
[ref-custom-roles]: /admin/users-and-permissions/custom-roles
[ref-manage-users]: /admin/users-and-permissions/manage-users
2. Enter the following values in the **SAML Settings** section:
| Name | Description |
| --------------------------- | ----------------------------------------------------------- |
| Audience (SP Entity ID) | Delete the prefilled value and leave empty |
| IdP Issuer (IdP Entity ID) | Use the **Issuer** value from Google Workspace |
| Identity Provider Login URL | Use the **Sign on URL** value from Google Workspace |
| Certificate | Use the **Signing Certificate** value from Google Workspace |
3. Enable **Auto-provision new users** if you want users to be automatically
created in Cube on their first login via this SAML provider. New users
are assigned the Viewer role by default — see
[Default role for new users](#default-role-for-new-users) to choose a
different role. Enable this if you are not using SCIM provisioning.
4. Scroll down and click **Save SAML Settings** to save the changes.
## Default role for new users
By default, users auto-provisioned via SAML receive the **Viewer** role.
To assign a different role, expand the **Advanced** section of the SAML
configuration form and pick from **Default role for new users**:
* **Developer**, **Explorer**, or **Viewer** — Cube Cloud's [default
roles][ref-roles].
* Any [custom role][ref-custom-roles] defined in your account, listed
below the divider.
The selected role applies **only when a user is first created**. Existing
users are not modified on subsequent SSO logins. It is applied **in
addition to** any roles your identity provider sends via the role
attribute (subject to the `rolesMap`).
Admin status is not assignable through this picker — Admin is controlled
separately. To grant admin permissions, update the user's role manually
under [Admin → Users][ref-manage-users].
If the selected role is later renamed or deleted, new users will fall
back to the **Viewer** role until you pick a valid role here. The Viewer
fallback applies whenever the configured default cannot be resolved —
whether that's because no default is set or the configured role no longer
exists.
## Test SAML authentication
To start using SAML authentication, use the
[single sign-on URL provided by Cube Cloud](#enable-saml-in-cube-cloud)
(typically `/sso/saml`) to log in to Cube Cloud.
[google-docs-create-saml-app]: https://support.google.com/a/answer/6087519?hl=en
[ref-roles]: /admin/users-and-permissions/roles-and-permissions
[ref-custom-roles]: /admin/users-and-permissions/custom-roles
[ref-manage-users]: /admin/users-and-permissions/manage-users