> ## Documentation Index
> Fetch the complete documentation index at: https://docs.cube.dev/llms.txt
> Use this file to discover all available pages before exploring further.
# Providing a custom data model for each tenant
> We have multiple users and we would like them to have different data models. These data models can be completely different or have something in common.
## Use case
We have multiple users and we would like them to have different data models.
These data models can be completely different or have something in common.
## Configuration
Let's assume that we have two users: `Alice` and `Bob`. We'll refer to them as
*tenants*. We're going to provide custom data models for these tenants by
implementing [multitenancy][ref-multitenancy].
### Multitenancy
First of all, we need to define the following configuration options so that Cube
knows how to distinguish between your tenants:
* [`context_to_app_id`][ref-context-to-app-id] to derive tenant identifiers
from security contexts.
* [`scheduled_refresh_contexts`][ref-scheduled-refresh-contexts] to provide
a list of security contexts.
Put the following code into your `cube.py` or `cube.js` [configuration
file][ref-config-files]:
```python title="Python" theme={"dark"}
from cube import config
@config('scheduled_refresh_contexts')
def scheduled_refresh_contexts() -> list[object]:
return [
{
'securityContext': { 'tenant_id': 'Alice' }
},
{
'securityContext': { 'tenant_id': 'Bob' }
}
]
@config('context_to_app_id')
def context_to_app_id(ctx: dict) -> str:
return ctx['securityContext']['tenant_id']
```
```javascript title="JavaScript" theme={"dark"}
module.exports = {
scheduledRefreshContexts: () => {
return [
{
securityContext: { tenant_id: 'Alice' }
},
{
securityContext: { tenant_id: 'Bob' }
}
]
},
contextToAppId: ({ securityContext }) => {
return securityContext.tenant_id
}
}
```
## Data modeling
### Customizing member-level access
The simplest way to customize the data models is by changing the [member-level access][ref-mls]
to data model entities. It works great for use cases when tenants share parts of
their data models.
By setting the `public` parameter of [cubes][ref-cubes-public], [views][ref-views-public],
[measures][ref-measures-public], [dimensions][ref-dimensions-public], and
[segments][ref-segments-public], you can ensure that each tenant has its unique
*perspective* of the whole data model.
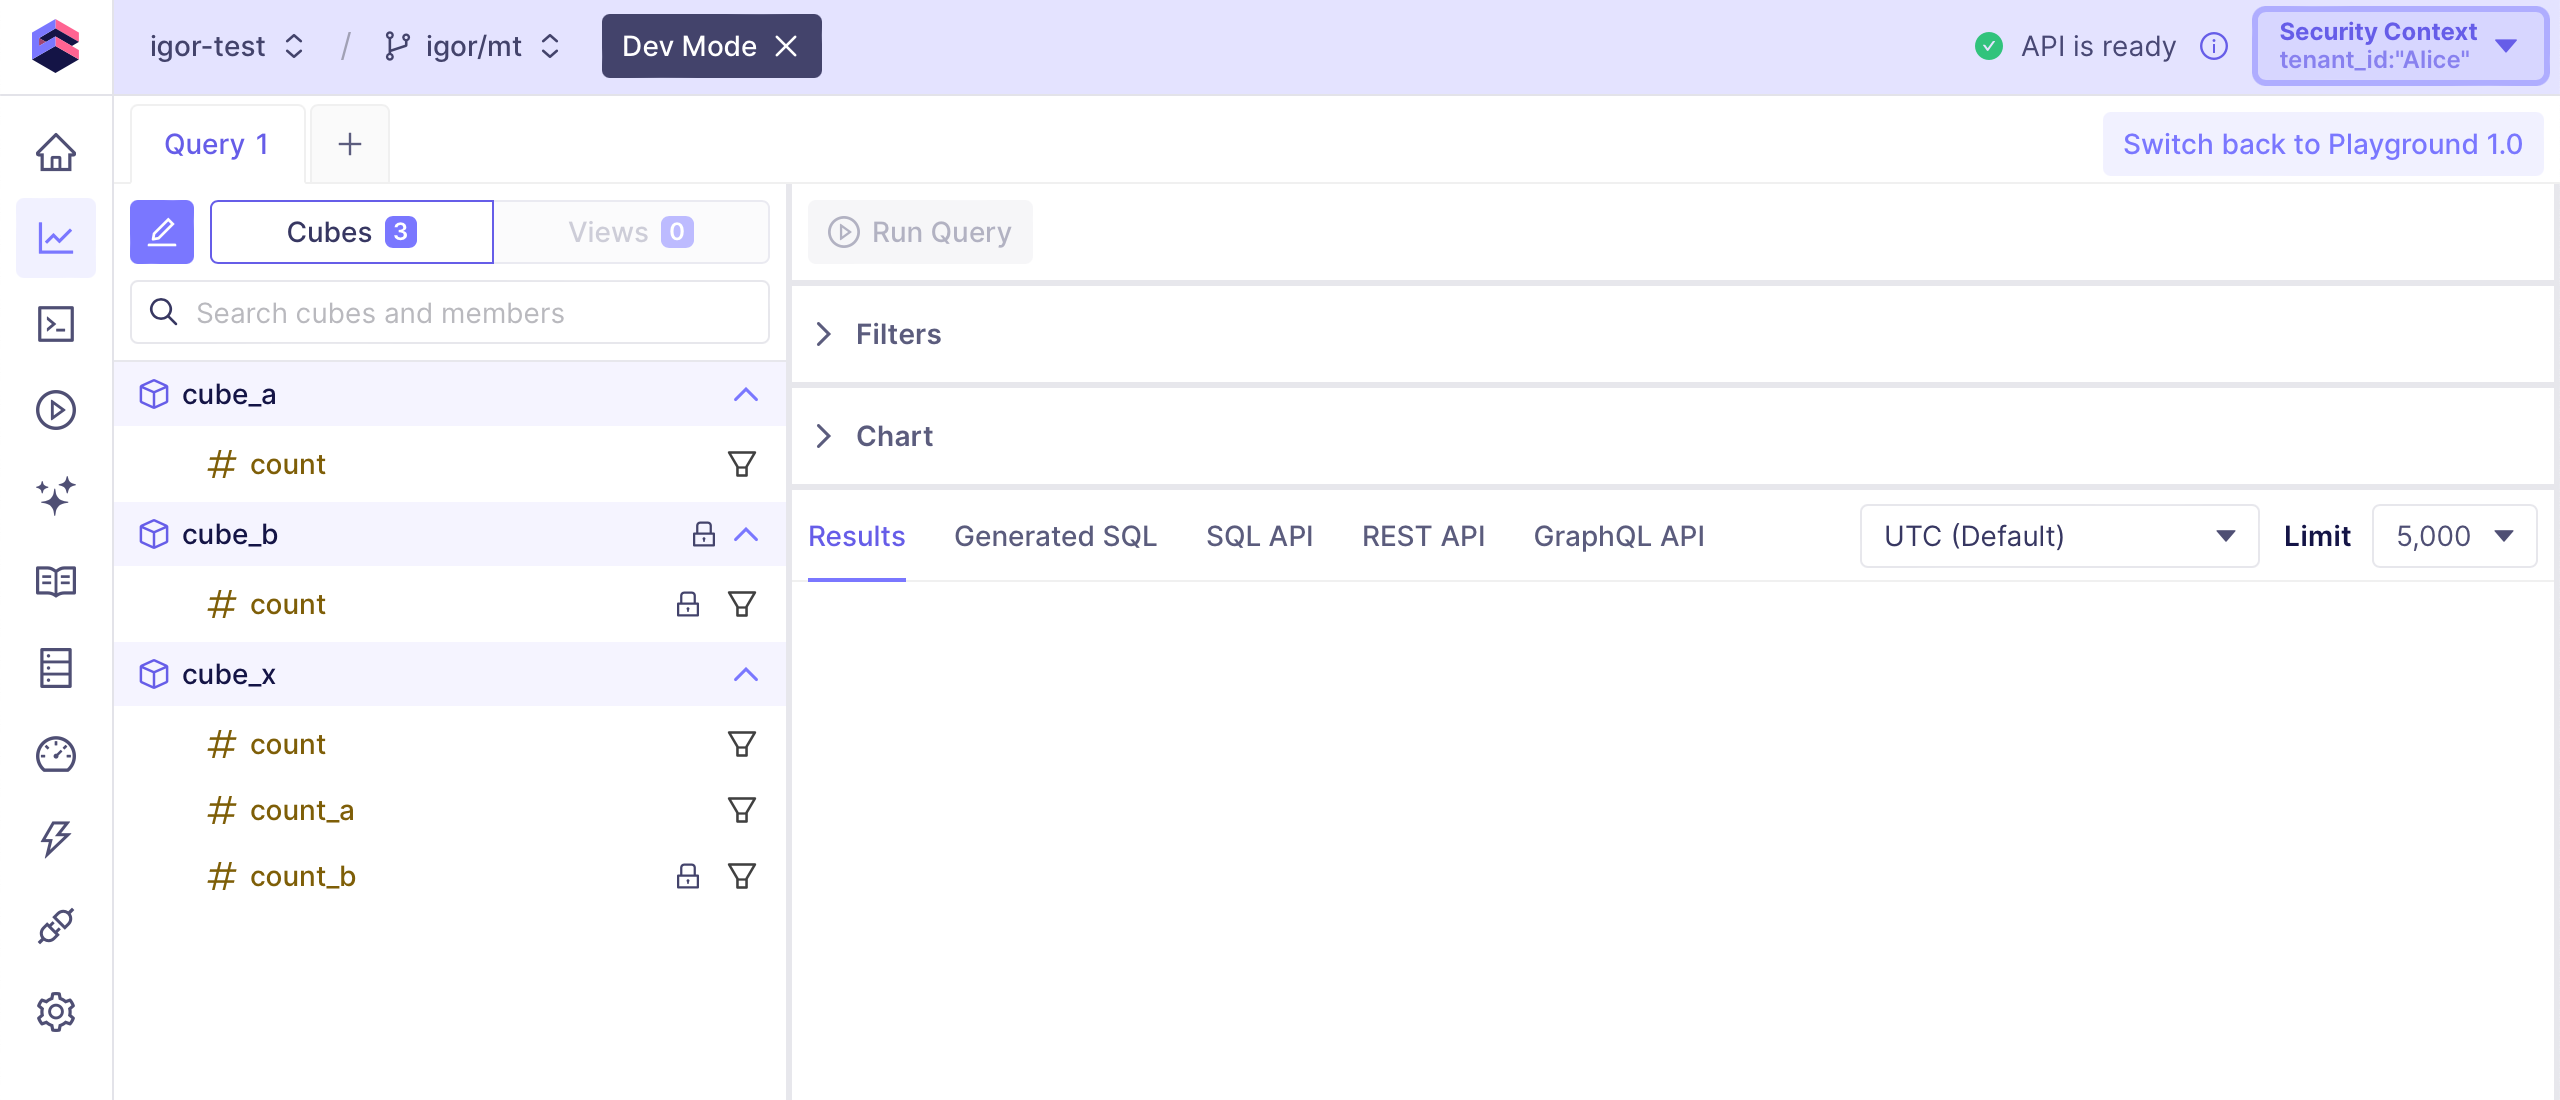
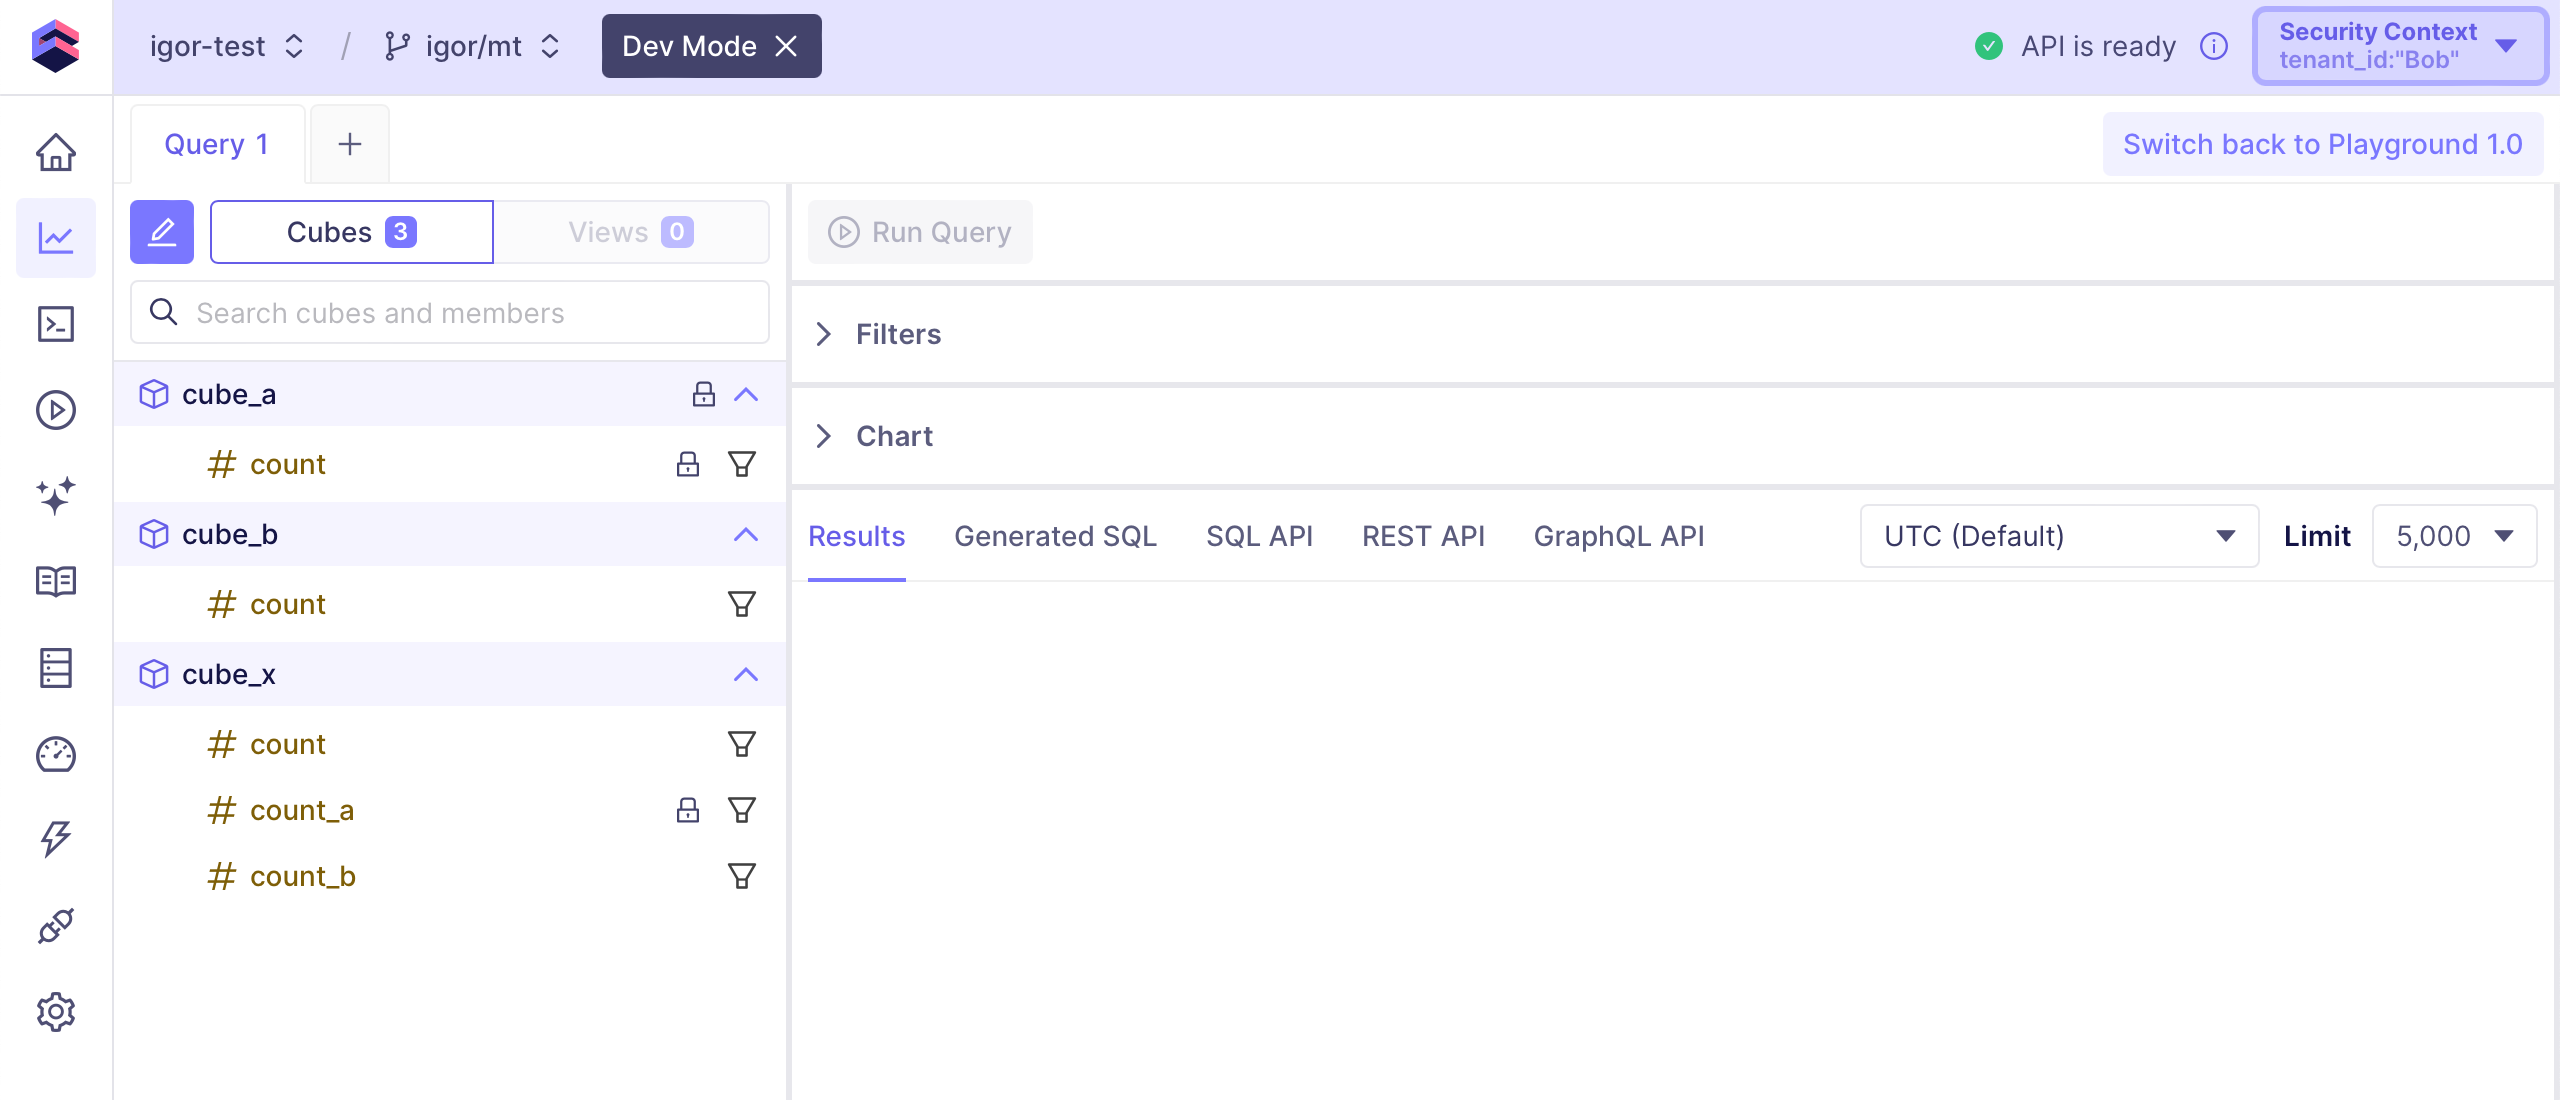
With the following data model, `Alice` will only have access to `cube_a`,
`Bob` will only have access to `cube_b`, and they both will have access to
select members of `cube_x`:
```yaml title="YAML" theme={"dark"}
{% set tenant_id = COMPILE_CONTEXT['securityContext']['tenant_id'] %}
cubes:
- name: cube_a
sql_table: table_a
public: {{ tenant_id == 'Alice' }}
measures:
- name: count
type: count
- name: cube_b
sql_table: table_b
public: {{ tenant_id == 'Bob' }}
measures:
- name: count
type: count
- name: cube_x
sql_table: table_x
measures:
- name: count
type: count
- name: count_a
type: count
public: {{ tenant_id == 'Alice' }}
- name: count_b
type: count
public: {{ tenant_id == 'Bob' }}
```
```javascript title="JavaScript" theme={"dark"}
const { tenant_id } = COMPILE_CONTEXT.securityContext
cube(`cube_a`, {
sql_table: `table_a`,
public: tenant_id == 'Alice',
measures: {
count: {
type: `count`
}
}
})
cube(`cube_b`, {
sql_table: `table_b`,
public: tenant_id == 'Bob',
measures: {
count: {
type: `count`
}
}
})
cube(`cube_x`, {
sql_table: `table_x`,
measures: {
count: {
type: `count`
},
count_a: {
type: `count`,
public: tenant_id == 'Alice'
},
count_b: {
type: `count`,
public: tenant_id == 'Bob'
}
}
})
```
For your convenience, [Playground][ref-playground] ignores member-level access configration
and marks data model entities that are not accessible for querying through
[APIs][ref-apis] with the lock icon.
Here's what `Alice` *sees*:
 And here's the *perspective* of `Bob`:
 ### Customizing other parameters
Similarly to [customizing member-level access](#customizing-member-level-access),
you can set other parameters of data model entities for each tenant individually:
* By setting `sql` or [`sql_table` parameters][ref-cube-sql-table] of cubes, you
can ensure that each tenant accesses data from its own tables or database schemas.
* By setting the [`data_source` parameter][ref-cube-data-source], you can point
each tenant to its own [data source][ref-data-sources], allowing to switch between
database names or even database servers.
* By setting the [`extends` parameter][ref-cube-extends], you can ensure that
cubes of some tenants are enriched with custom measures, dimensions, or joins.
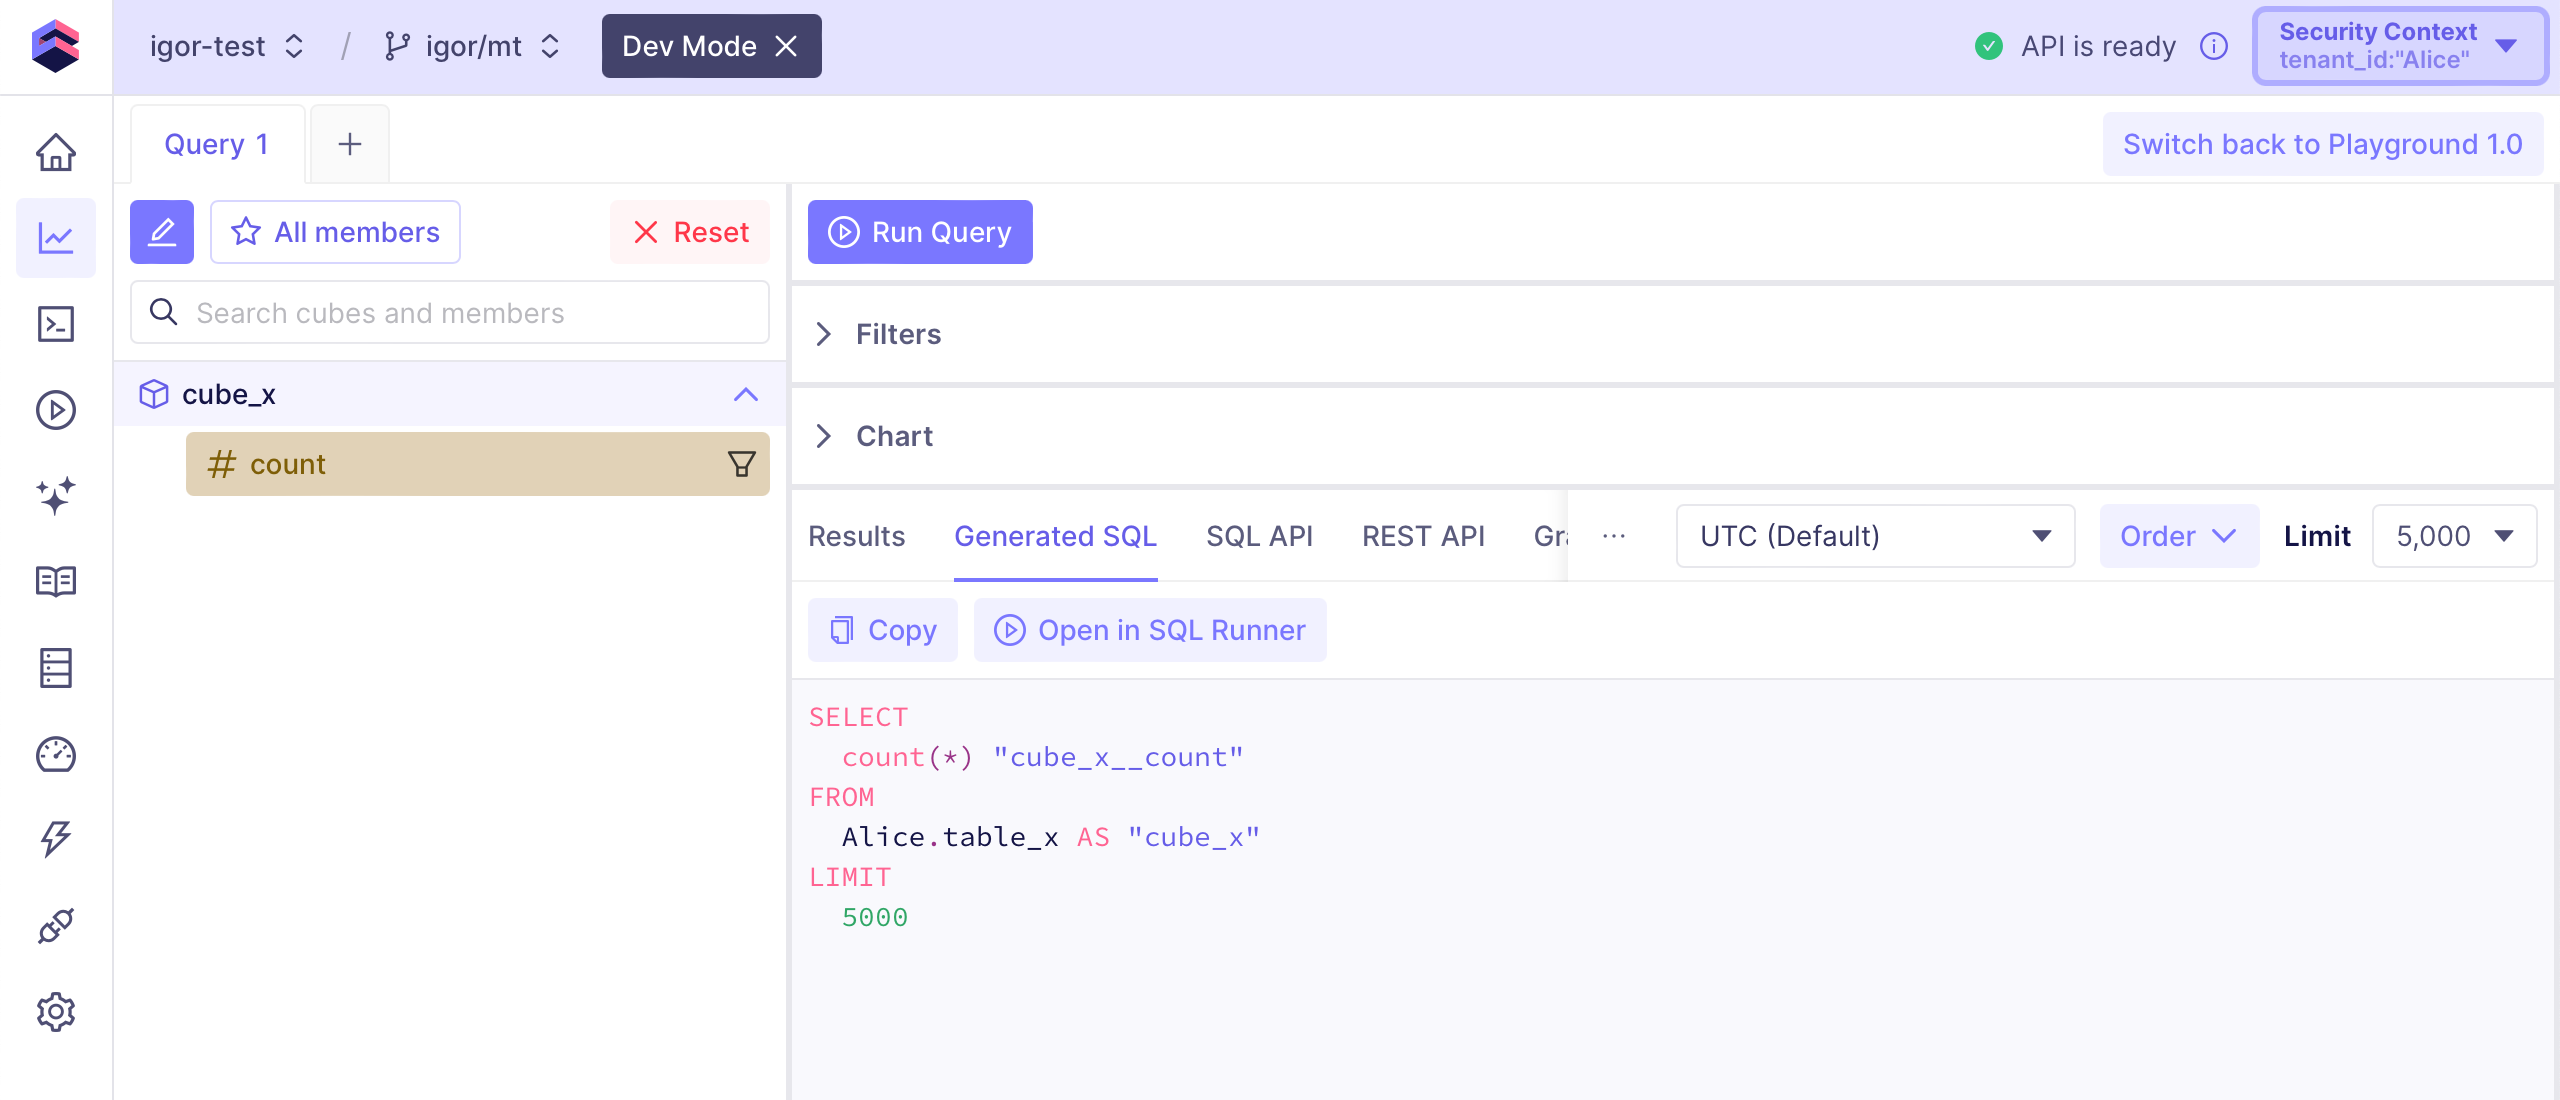
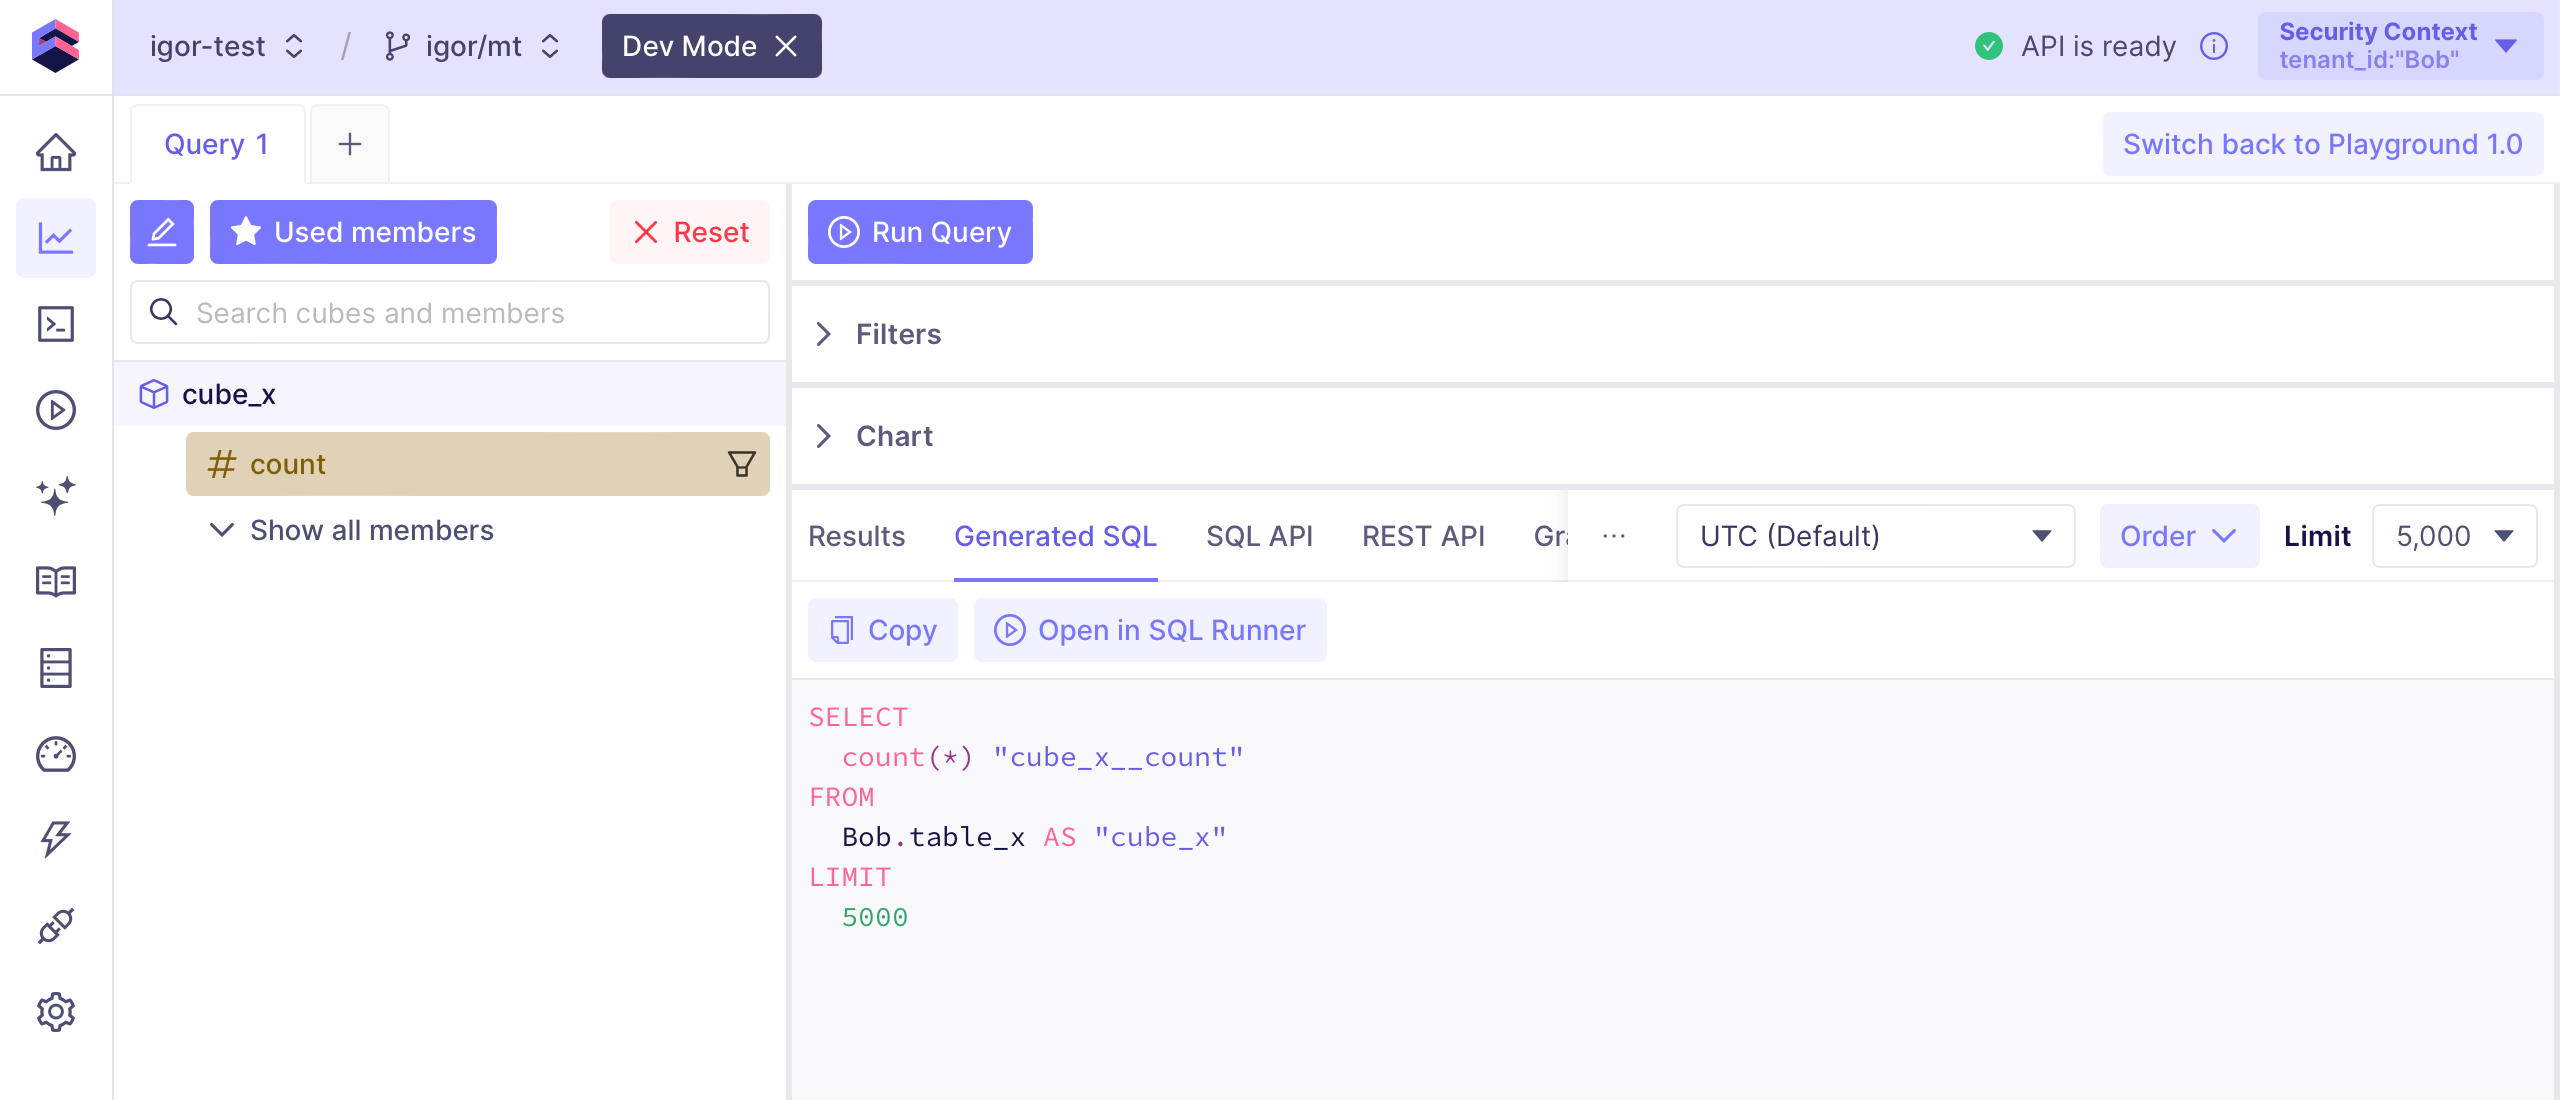
With the following data model, `cube_x` will read data from the `Alice` database
schema for `Alice` and from `Bob` database schema for `Bob`:
```yaml title="YAML" theme={"dark"}
{% set tenant_id = COMPILE_CONTEXT['securityContext']['tenant_id'] %}
cubes:
- name: cube_x
sql_table: {{ tenant_id | safe }}.table_x
measures:
- name: count
type: count
```
```javascript title="JavaScript" theme={"dark"}
const { tenant_id } = COMPILE_CONTEXT.securityContext
cube(`cube_x`, {
sql_table: `${tenant_id}.table_x`,
measures: {
count: {
type: `count`
}
}
})
```
Here's the generated SQL for `Alice`:
### Customizing other parameters
Similarly to [customizing member-level access](#customizing-member-level-access),
you can set other parameters of data model entities for each tenant individually:
* By setting `sql` or [`sql_table` parameters][ref-cube-sql-table] of cubes, you
can ensure that each tenant accesses data from its own tables or database schemas.
* By setting the [`data_source` parameter][ref-cube-data-source], you can point
each tenant to its own [data source][ref-data-sources], allowing to switch between
database names or even database servers.
* By setting the [`extends` parameter][ref-cube-extends], you can ensure that
cubes of some tenants are enriched with custom measures, dimensions, or joins.
With the following data model, `cube_x` will read data from the `Alice` database
schema for `Alice` and from `Bob` database schema for `Bob`:
```yaml title="YAML" theme={"dark"}
{% set tenant_id = COMPILE_CONTEXT['securityContext']['tenant_id'] %}
cubes:
- name: cube_x
sql_table: {{ tenant_id | safe }}.table_x
measures:
- name: count
type: count
```
```javascript title="JavaScript" theme={"dark"}
const { tenant_id } = COMPILE_CONTEXT.securityContext
cube(`cube_x`, {
sql_table: `${tenant_id}.table_x`,
measures: {
count: {
type: `count`
}
}
})
```
Here's the generated SQL for `Alice`:
 And here's the generated SQL for `Bob`:
 ### Dynamic data modeling
A more advanced way to customize the data models is by using [dynamic data
models][ref-dynamic-data-modeling]. It allows to create fully customized data
models for each tenant programmatically.
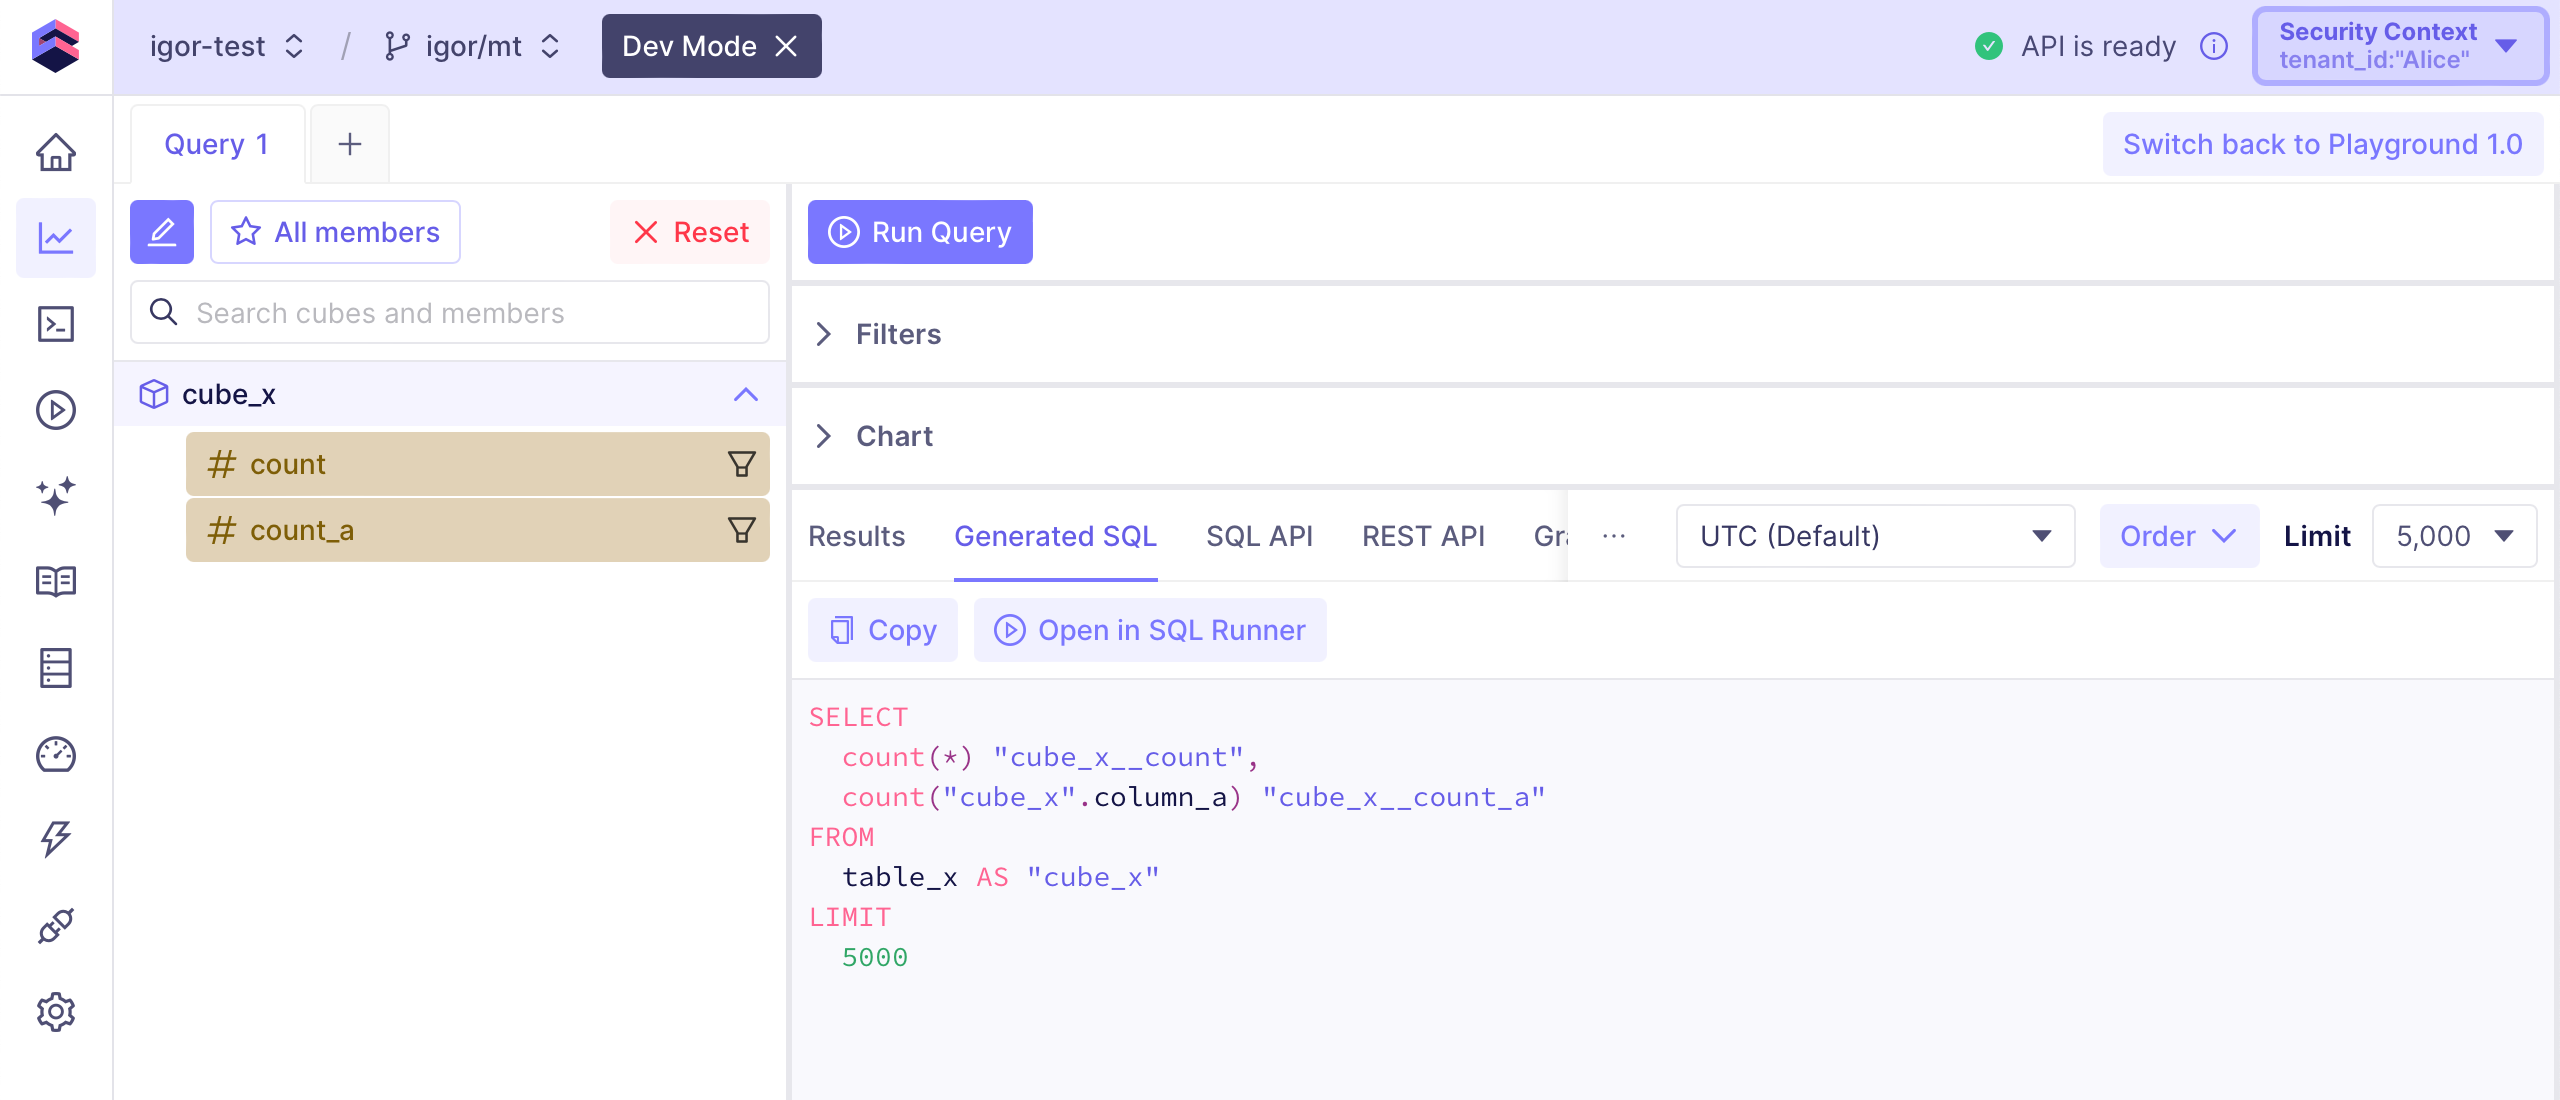
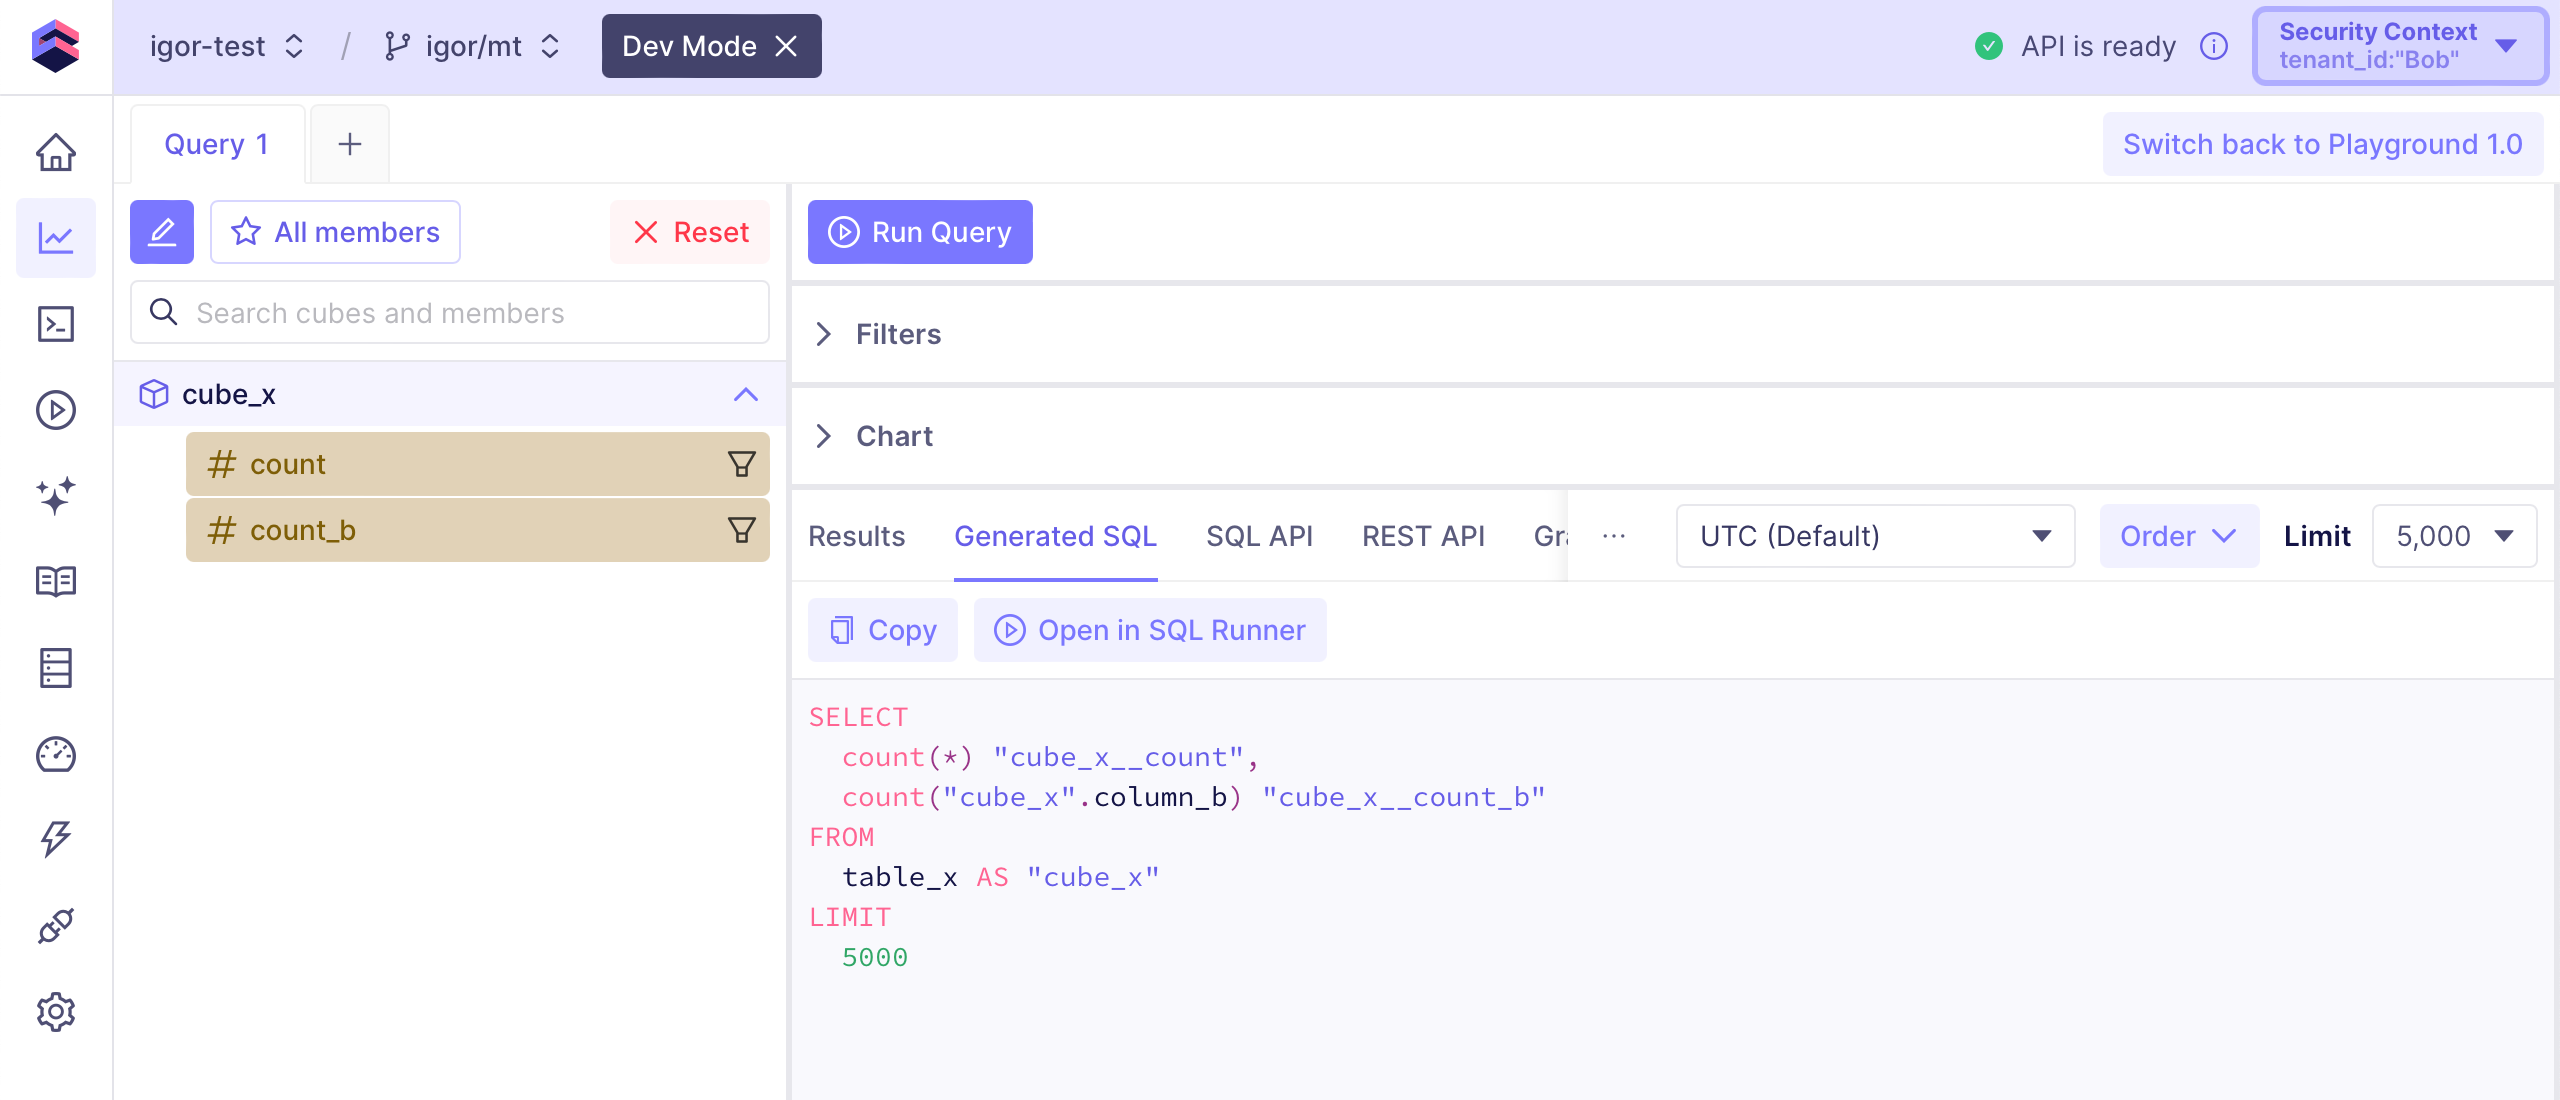
With the following data model, `cube_x` will have the `count_a` measure for
`Alice` and the `count_b` measure for `Bob`:
```yaml title="YAML" theme={"dark"}
{% set tenant_id = COMPILE_CONTEXT['securityContext']['tenant_id'] %}
cubes:
- name: cube_x
sql_table: table_x
measures:
- name: count
type: count
{% if tenant_id == 'Alice' %}
- name: count_a
sql: column_a
type: count
{% endif %}
{% if tenant_id == 'Bob' %}
- name: count_b
sql: column_b
type: count
{% endif %}
```
```javascript title="JavaScript" theme={"dark"}
const { tenant_id } = COMPILE_CONTEXT.securityContext
const measures = {
count: {
type: `count`
}
}
if (tenant_id == 'Alice') {
measures['count_a'] = {
sql: () => `column_a`,
type: `count`
}
}
if (tenant_id == 'Bob') {
measures['count_b'] = {
sql: () => `column_b`,
type: `count`
}
}
cube(`cube_x`, {
sql_table: `table_x`,
measures
})
```
Here's the data model and the generated SQL for `Alice`:
### Dynamic data modeling
A more advanced way to customize the data models is by using [dynamic data
models][ref-dynamic-data-modeling]. It allows to create fully customized data
models for each tenant programmatically.
With the following data model, `cube_x` will have the `count_a` measure for
`Alice` and the `count_b` measure for `Bob`:
```yaml title="YAML" theme={"dark"}
{% set tenant_id = COMPILE_CONTEXT['securityContext']['tenant_id'] %}
cubes:
- name: cube_x
sql_table: table_x
measures:
- name: count
type: count
{% if tenant_id == 'Alice' %}
- name: count_a
sql: column_a
type: count
{% endif %}
{% if tenant_id == 'Bob' %}
- name: count_b
sql: column_b
type: count
{% endif %}
```
```javascript title="JavaScript" theme={"dark"}
const { tenant_id } = COMPILE_CONTEXT.securityContext
const measures = {
count: {
type: `count`
}
}
if (tenant_id == 'Alice') {
measures['count_a'] = {
sql: () => `column_a`,
type: `count`
}
}
if (tenant_id == 'Bob') {
measures['count_b'] = {
sql: () => `column_b`,
type: `count`
}
}
cube(`cube_x`, {
sql_table: `table_x`,
measures
})
```
Here's the data model and the generated SQL for `Alice`:
 And here's the data model and the generated SQL for `Bob`:
 ### Loading from disk
You can also maintain independent data models for each tenant that you would load
from separate locations on disk. It allows to create fully customized data
models for each tenant that are maintained mostly as static files.
By using the [`repository_factory` option][ref-repository-factory] with the
`file_repository` utility, you can load data model files for each tenant from
a custom path.
With the following configuration, `Alice` will load the data model files from
`model/Alice` while `Bob` will load the data model files from `model/Bob`:
```python title="Python" theme={"dark"}
from cube import config, file_repository
@config('repository_factory')
def repository_factory(ctx: dict) -> list[dict]:
return file_repository(f"model/{ctx['securityContext']['tenant_id']}")
# Other configuration options, e.g., for multitenancy, etc.
```
```javascript title="JavaScript" theme={"dark"}
const { FileRepository } = require("@cubejs-backend/server-core")
module.exports = {
repositoryFactory: ({ securityContext }) => {
return new FileRepository(`model/${securityContext.tenant_id}`)
}
// Other configuration options, e.g., for multitenancy, etc.
}
```
#### Example
Here's an example of how to use this approach. Let's say we have a folder structure
as follows:
```tree theme={"dark"}
model/
├── avocado/
│ └── cubes
│ └── Products.js
└── mango/
└── cubes
└── Products.js
```
Let's configure Cube to use a specific data model path for each tenant using the
`repositoryFactory` function along with `contextToAppId` and `scheduledRefreshContexts`:
```javascript theme={"dark"}
const { FileRepository } = require("@cubejs-backend/server-core")
module.exports = {
contextToAppId: ({ securityContext }) =>
`CUBE_APP_${securityContext.tenant}`,
repositoryFactory: ({ securityContext }) =>
new FileRepository(`model/${securityContext.tenant}`),
scheduledRefreshContexts: () => [
{ securityContext: { tenant: "avocado" } },
{ securityContext: { tenant: "mango" } }
]
}
```
In this example, we'll filter products differently for each tenant. For the `avocado`
tenant, we'll show products with odd `id` values, and for the `mango` tenant, we'll show
products with even `id` values.
This is the `products` cube for the `avocado` tenant:
```yaml title="YAML" theme={"dark"}
cubes:
- name: products
sql: |
SELECT * FROM public.Products WHERE MOD (id, 2) = 1
```
```javascript title="JavaScript" theme={"dark"}
cube(`products`, {
sql: `SELECT *
FROM public.Products
WHERE MOD (id, 2) = 1`,
// ...
})
```
This is the `products` cube for the `mango` tenant:
```yaml title="YAML" theme={"dark"}
cubes:
- name: products
sql: |
SELECT * FROM public.Products WHERE MOD (id, 2) = 0
```
```javascript title="JavaScript" theme={"dark"}
cube(`products`, {
sql: `SELECT *
FROM public.Products
WHERE MOD (id, 2) = 0`,
// ...
})
```
To fetch the products for different tenants, we send the same query but with different
JWTs:
```json theme={"dark"}
{
"sub": "1234567890",
"tenant": "Avocado",
"iat": 1000000000,
"exp": 5000000000
}
```
```json5 theme={"dark"}
{
sub: "1234567890",
tenant: "Mango",
iat: 1000000000,
exp: 5000000000,
}
```
This approach produces different results for each tenant as expected:
```json5 theme={"dark"}
// Avocado products
[
{
"products.id": 1,
"products.name": "Generic Fresh Keyboard",
},
{
"products.id": 3,
"products.name": "Practical Wooden Keyboard",
},
{
"products.id": 5,
"products.name": "Handcrafted Rubber Chicken",
},
]
```
```json5 theme={"dark"}
// Mango products:
[
{
"products.id": 2,
"products.name": "Gorgeous Cotton Sausages",
},
{
"products.id": 4,
"products.name": "Handmade Wooden Soap",
},
{
"products.id": 6,
"products.name": "Handcrafted Plastic Chair",
},
]
```
You can find a working example of this approach on [GitHub](https://github.com/cube-js/cube/tree/master/examples/recipes/using-different-schemas-for-tenants).
Run it with the `docker-compose up` command to see the results in your console.
### Loading externally
Finally, you can maintain independent data models for each tenant that you would
load from an external location rather from a folder on disk. Good examples of
such locations are an S3 bucket, a database, or an external API. It allows to
provide fully customized data models for each tenant that you have full control of.
It can be achieved by using the same [`repository_factory` option][ref-repository-factory].
Instead of using the `file_repository` utility, you would have to write your own
code that fetches data model files for each tenant.
[ref-multitenancy]: /embedding/multitenancy
[ref-scheduled-refresh-contexts]: /reference/configuration/config#scheduled_refresh_contexts
[ref-context-to-app-id]: /reference/configuration/config#context_to_app_id
[ref-config-files]: /admin/connect-to-data#cubepy-and-cubejs-files
[ref-mls]: /docs/data-modeling/access-control/member-level-security
[ref-cubes-public]: /reference/data-modeling/cube#public
[ref-views-public]: /reference/data-modeling/view#public
[ref-measures-public]: /reference/data-modeling/measures#public
[ref-dimensions-public]: /reference/data-modeling/dimensions#public
[ref-segments-public]: /reference/data-modeling/segments#public
[ref-playground]: /docs/explore-analyze/playground
[ref-apis]: /reference
[ref-cube-sql-table]: /reference/data-modeling/cube#sql_table
[ref-cube-data-source]: /reference/data-modeling/cube#data_source
[ref-data-sources]: /admin/connect-to-data/multiple-data-sources
[ref-cube-extends]: /reference/data-modeling/cube#extends
[ref-dynamic-data-modeling]: /docs/data-modeling/dynamic
[ref-repository-factory]: /reference/configuration/config#repository_factory
### Loading from disk
You can also maintain independent data models for each tenant that you would load
from separate locations on disk. It allows to create fully customized data
models for each tenant that are maintained mostly as static files.
By using the [`repository_factory` option][ref-repository-factory] with the
`file_repository` utility, you can load data model files for each tenant from
a custom path.
With the following configuration, `Alice` will load the data model files from
`model/Alice` while `Bob` will load the data model files from `model/Bob`:
```python title="Python" theme={"dark"}
from cube import config, file_repository
@config('repository_factory')
def repository_factory(ctx: dict) -> list[dict]:
return file_repository(f"model/{ctx['securityContext']['tenant_id']}")
# Other configuration options, e.g., for multitenancy, etc.
```
```javascript title="JavaScript" theme={"dark"}
const { FileRepository } = require("@cubejs-backend/server-core")
module.exports = {
repositoryFactory: ({ securityContext }) => {
return new FileRepository(`model/${securityContext.tenant_id}`)
}
// Other configuration options, e.g., for multitenancy, etc.
}
```
#### Example
Here's an example of how to use this approach. Let's say we have a folder structure
as follows:
```tree theme={"dark"}
model/
├── avocado/
│ └── cubes
│ └── Products.js
└── mango/
└── cubes
└── Products.js
```
Let's configure Cube to use a specific data model path for each tenant using the
`repositoryFactory` function along with `contextToAppId` and `scheduledRefreshContexts`:
```javascript theme={"dark"}
const { FileRepository } = require("@cubejs-backend/server-core")
module.exports = {
contextToAppId: ({ securityContext }) =>
`CUBE_APP_${securityContext.tenant}`,
repositoryFactory: ({ securityContext }) =>
new FileRepository(`model/${securityContext.tenant}`),
scheduledRefreshContexts: () => [
{ securityContext: { tenant: "avocado" } },
{ securityContext: { tenant: "mango" } }
]
}
```
In this example, we'll filter products differently for each tenant. For the `avocado`
tenant, we'll show products with odd `id` values, and for the `mango` tenant, we'll show
products with even `id` values.
This is the `products` cube for the `avocado` tenant:
```yaml title="YAML" theme={"dark"}
cubes:
- name: products
sql: |
SELECT * FROM public.Products WHERE MOD (id, 2) = 1
```
```javascript title="JavaScript" theme={"dark"}
cube(`products`, {
sql: `SELECT *
FROM public.Products
WHERE MOD (id, 2) = 1`,
// ...
})
```
This is the `products` cube for the `mango` tenant:
```yaml title="YAML" theme={"dark"}
cubes:
- name: products
sql: |
SELECT * FROM public.Products WHERE MOD (id, 2) = 0
```
```javascript title="JavaScript" theme={"dark"}
cube(`products`, {
sql: `SELECT *
FROM public.Products
WHERE MOD (id, 2) = 0`,
// ...
})
```
To fetch the products for different tenants, we send the same query but with different
JWTs:
```json theme={"dark"}
{
"sub": "1234567890",
"tenant": "Avocado",
"iat": 1000000000,
"exp": 5000000000
}
```
```json5 theme={"dark"}
{
sub: "1234567890",
tenant: "Mango",
iat: 1000000000,
exp: 5000000000,
}
```
This approach produces different results for each tenant as expected:
```json5 theme={"dark"}
// Avocado products
[
{
"products.id": 1,
"products.name": "Generic Fresh Keyboard",
},
{
"products.id": 3,
"products.name": "Practical Wooden Keyboard",
},
{
"products.id": 5,
"products.name": "Handcrafted Rubber Chicken",
},
]
```
```json5 theme={"dark"}
// Mango products:
[
{
"products.id": 2,
"products.name": "Gorgeous Cotton Sausages",
},
{
"products.id": 4,
"products.name": "Handmade Wooden Soap",
},
{
"products.id": 6,
"products.name": "Handcrafted Plastic Chair",
},
]
```
You can find a working example of this approach on [GitHub](https://github.com/cube-js/cube/tree/master/examples/recipes/using-different-schemas-for-tenants).
Run it with the `docker-compose up` command to see the results in your console.
### Loading externally
Finally, you can maintain independent data models for each tenant that you would
load from an external location rather from a folder on disk. Good examples of
such locations are an S3 bucket, a database, or an external API. It allows to
provide fully customized data models for each tenant that you have full control of.
It can be achieved by using the same [`repository_factory` option][ref-repository-factory].
Instead of using the `file_repository` utility, you would have to write your own
code that fetches data model files for each tenant.
[ref-multitenancy]: /embedding/multitenancy
[ref-scheduled-refresh-contexts]: /reference/configuration/config#scheduled_refresh_contexts
[ref-context-to-app-id]: /reference/configuration/config#context_to_app_id
[ref-config-files]: /admin/connect-to-data#cubepy-and-cubejs-files
[ref-mls]: /docs/data-modeling/access-control/member-level-security
[ref-cubes-public]: /reference/data-modeling/cube#public
[ref-views-public]: /reference/data-modeling/view#public
[ref-measures-public]: /reference/data-modeling/measures#public
[ref-dimensions-public]: /reference/data-modeling/dimensions#public
[ref-segments-public]: /reference/data-modeling/segments#public
[ref-playground]: /docs/explore-analyze/playground
[ref-apis]: /reference
[ref-cube-sql-table]: /reference/data-modeling/cube#sql_table
[ref-cube-data-source]: /reference/data-modeling/cube#data_source
[ref-data-sources]: /admin/connect-to-data/multiple-data-sources
[ref-cube-extends]: /reference/data-modeling/cube#extends
[ref-dynamic-data-modeling]: /docs/data-modeling/dynamic
[ref-repository-factory]: /reference/configuration/config#repository_factory