

target/manifest.json your own CI job produced. Uploading the manifest converts the
exact artifact your pipeline validated and doesn’t require Cube to have a credential
for the dbt repository.
Pulls can run manually, from your CI/CD pipeline, automatically on every push to your
dbt repository, or from Analytics Chat — so your
semantic layer stays in sync with dbt as it evolves.
How it works
Every pull converts a dbt manifest into cube definitions and, by default, commits the generated files to a review branch — or hands them back to your own pipeline. How the manifest reaches Cube depends on the source:- Git (default): Cube creates a short-lived, isolated sandbox, clones the selected
branch, installs dependencies with
dbt deps, and runsdbt parse. It converts the resultingtarget/manifest.json, commits the cubes, and tears the sandbox down. - Uploaded manifest: Your pipeline runs
dbt parse,dbt compile,dbt run, ordbt build, then uploads the resultingtarget/manifest.jsonwith the Cube CLI. Cube validates and converts that artifact directly. It doesn’t create a sandbox, clone a repository, or run dbt, so this path usually takes seconds rather than minutes.
dbt parse, which doesn’t query the warehouse. A manifest pull doesn’t run dbt
at all, although the pipeline command that produced the manifest might. The generated
cubes assume the underlying tables were already built by your production dbt job. The
one Cube-side exception is Infer column types from dbt catalog,
an opt-in option for Git-based pulls that reads real column types from the warehouse.
dbt pull writes static cube files. To render cubes from one or more manifests when the
data model compiles instead, see Using Cube with dbt,
which uses the Python cube_dbt package. Ready-made Cube CLI pipelines for dbt pull,
including several dbt projects in one deployment, are collected in
dbt pull with the Cube CLI.
Prerequisites
- A supported data warehouse. dbt pull supports Snowflake, Amazon Redshift, PostgreSQL, Google BigQuery, Databricks, Amazon Athena, and ClickHouse. If your deployment uses any other database type, the pull dialog will tell you it’s unsupported.
- A source for dbt metadata: either a Git repository Cube can reach over HTTPS or
SSH, with a PAT or read-only deploy key; or a CI job that can produce and upload
target/manifest.jsonwith the Cube CLI. GitHub, GitLab, Bitbucket, Azure DevOps, and self-hosted Git servers all work for the Git source. - For the generated cubes to return data, the dbt models must already be built into
your warehouse by your normal production
dbt run. dbt pull generates cube definitions that point at each model’s relation; it does not create the underlying tables. Models may live in several schemas — the schema is resolved per model from your dbt project, not taken from a single setting (see Models in several schemas).
Connect your dbt repository
The dbt connection is configured on your deployment’s default data source.manifest.json. A manifest pull doesn’t
need a dbt Git integration or repository credential. When an integration is configured,
its conversion settings still shape the generated cubes.Open the data source settings
Fill in the connection fields
Choose an authentication method
- HTTPS + personal access token — paste a PAT with read access to the repository. Leave it unchanged on later edits to reuse the existing token.
- SSH deploy key — Cube generates a key pair for you and shows you the public key to register as a read-only deploy key on your Git host. The private key is generated and stored server-side and never leaves Cube.
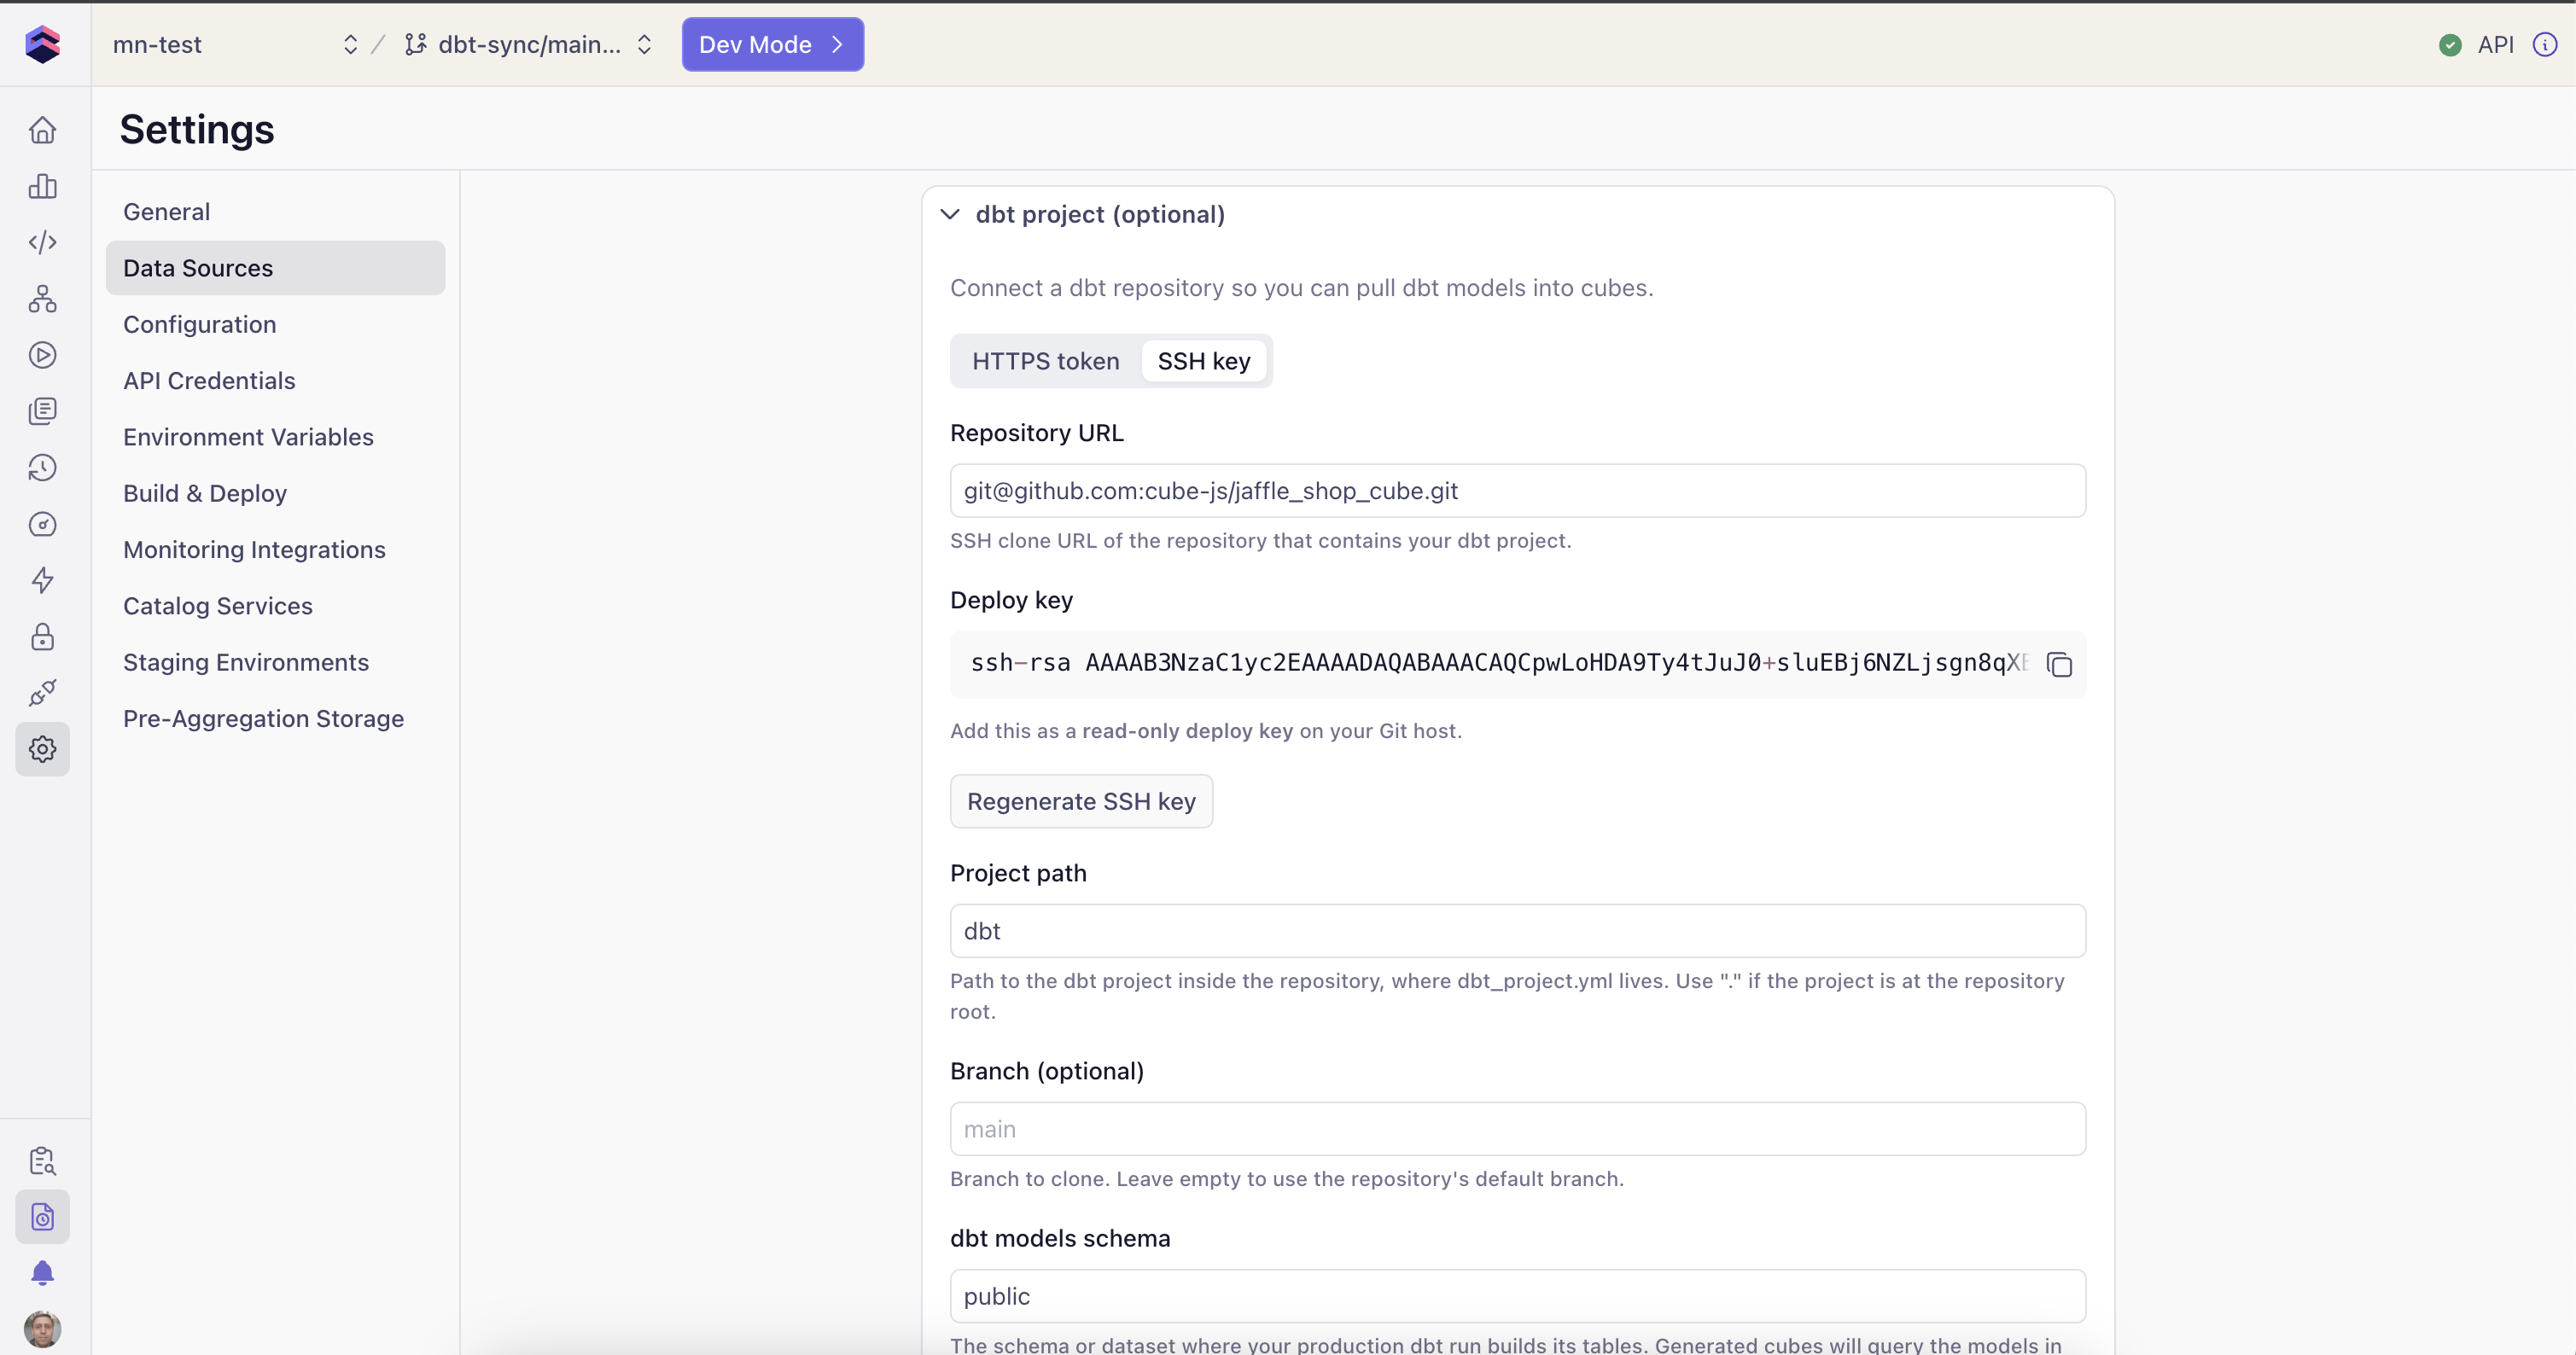
Test the connection
- “Repository is reachable” — you’re good to save.
- An error message identifying the problem (invalid/expired token, repository not found, host unreachable, not a Git URL, etc.).
Save
Models in several schemas
Generated cubes take their schema per model, from what dbt resolved for that model — so a project that builds intoanalytics, reports and intermediate
produces cubes pointing at all three. dbt target schema is not applied to every
model; it is the default for models that don’t declare a schema of their own.
dbt decides each model’s schema at parse time by calling its generate_schema_name
macro, so what you get depends on which macro your project uses:
.yml and read its
sql_table — the schema in it is the one dbt picked for that model. If every cube
carries the same schema and your project expects several, that’s the misconfigured
target described in the warning above. (Cube support can also see a per-model
declared-vs-resolved breakdown in the sync logs for a given pull.)
Configure pull settings
Pull options are saved on the integration itself. Options that shape conversion apply to Git and uploaded-manifest pulls. A manifest pull without an integration uses the defaults below. Options that require Cube to run dbt apply only to the Git source.Primary key detection
A cube’sprimary_key states the model’s grain, and Cube relies on it to aggregate
correctly across joins. The pull looks for it in three tiers and uses the first one that
yields a key:
- dbt
primary_keyconstraints — both column-level and model-level (composite) constraint blocks. Always honored, even when both detection options are off. - Strict
unique+not_nulltests on the same column. Only tests that actually guarantee uniqueness count — a test withwhere:,severity: warn, or a relaxederror_ifis ignored. - Column-name suffixes,
_idby default.
stg_customers → customer_id, with layer
prefixes (stg_, dim_, fct_, …) stripped and plurals reduced — and deprioritizes
columns dbt declares as foreign keys, unless that would leave no candidate at all (on a
1:1 satellite table, the foreign key is the table’s own key).
Separately from the tiers, a column that another cube joins to is marked as a key on the
referenced cube — Cube can’t resolve the join otherwise. This is additive: it applies
whether or not the tiers already found a key, so a cube can end up with a declared key
plus a joined-to column. The cube on the other side — the one that owns the foreign
key — gets no key from this, which is the usual reason a cube in a join ends up without
one.
To key a cube on something the pull wouldn’t guess — a composite key, or a column your
suffixes don’t cover — declare it in dbt. Constraints require an
enforced model contract,
which in turn requires a data_type on every column of the model:
dbt parse; a
manifest pull reads it from the artifact you upload.
If your project doesn’t use contracts, tier 2 is the way to declare a single-column key:
add unique and not_null tests to it.
A declared key is never overridden or widened by the guessing tiers — only a joined-to
column can add to it. If a cube that participates in a join ends up with no key at all,
the pull still writes the file, and what happens next depends on the cube’s measures:
- With a
count,sum,avg, ornumbermeasure — including thecountthat Add default measures adds to every cube — the data model fails to compile withprimary key for '<cube>' is required when join is defined in order to make aggregates work properly. - Without one, there’s no compile error, but the join is dropped: a query that touches
both cubes then fails with
Can't find join path to join '<cube>', '<cube>'.
.yml is where to check what the pull decided — every key it
detected is a dimension with primary_key: true.
Infer column types from dbt catalog
Without it, a dimension’s type comes from adata_type declared in your dbt YAML, and —
when none is declared — from a column-name heuristic (*_id → number, created_at →
time, …). Enable this option and the pull additionally runs dbt docs generate to
produce dbt’s catalog.json, which carries the actual warehouse column types.
This option is only available for the Git source. An uploaded-manifest pull never runs
dbt and accepts only manifest.json, so it uses declared data types from that artifact
and the column-name fallback.
Type precedence becomes: declared data_type → catalog type → column-name heuristic.
An explicit data_type in your dbt YAML still wins; the catalog only fills the gaps.
- This step connects to your warehouse (
dbt docs generatequeries the warehouse metadata), unlike the rest of the pull. The models must already be built. - Supported on Snowflake, Amazon Redshift, PostgreSQL, and ClickHouse. It’s skipped on Google BigQuery, Databricks, and Amazon Athena, whose sandbox profiles can’t open a connection.
- Best-effort. If catalog generation or the catalog read fails — no connectivity, unbuilt models, unreadable file — it’s logged and skipped, and the pull completes on declared and name-based types exactly as it would with the option off.
Cube visibility
Generated cubes are public by default. There are two ways to hide them, and both survive every pull. Per model or column, in dbt. Declarepublic under meta.cube in your dbt YAML:
- On a model, this sets the generated cube’s
public. - On a column, it hides that column’s dimension and any
summeasure built from it. The cube’scountmeasure stays visible. - The top-level
meta:key works too, on models and columns. If one carries both,config.metawins. - A column’s
config:block needs dbt Core 1.10 or later. On older versions, declare a column’smeta:at the top level of the column instead. - Use a boolean. In dbt YAML the pull also accepts the strings
"true"/"false"in any casing and writes a real boolean to the generated cube. Any other value is treated as not declared: a column stays public, and a model falls back to Mark pulled cubes as public.
meta.cube.public. This also
covers models added to dbt later, so a raw layer stays private without a meta block
on each model. A model’s own declaration always takes precedence, so you can still
expose selected models with public: true. The option sets the cube’s public only
and leaves its dimensions and measures as they are.
A common pattern is to keep the pulled layer private and expose it through
views, which can include members of private cubes.
A cube that extends a private generated
cube inherits public: false, so set public: true on it to expose it.
Pass environment variables to dbt
This section applies only to Git-based pulls. A manifest pull runs no dbt process in Cube; provide any variables to the pipeline command that creates the manifest. Some dbt projects read environment variables while the sandbox runs — most commonly a token used to install a private dbt package. For example, apackages.yml that pulls a package from a private Git repository:
dbt deps fails inside the sandbox unless DBT_PACKAGES_TOKEN is available
to it. Data source connection variables (CUBEJS_DB_*) reach the sandbox automatically;
any other variable does not, unless you select it.
DBT_SANDBOX_VERSION isn’t selectable either — Cube reads
it to decide which dbt Core to install.
In the dbt project settings card, the Environment variables picker lets
you choose which of the deployment’s environment variables to pass into the
sandbox. You select variables by name — their values stay in the deployment
env, are resolved server-side at sync time, and never reach the browser.
Define the variable on the deployment
DBT_PACKAGES_TOKEN) with its value, if it isn’t set already.Select it in the dbt settings
Reference it in dbt
env_var('DBT_PACKAGES_TOKEN'), as in the
packages.yml example above. It’s now available to dbt deps, dbt parse, and
the rest of the pull.CUBEJS_DB_* connection variables, DBT_SANDBOX_VERSION, and a few names reserved by
the sync itself (schema, dbt profile, and Git internals), can’t be selected. If a
selected variable is later removed from the deployment env, it’s skipped on the next
sync and the settings card flags it.Set the dbt Core version
This section applies only to Git-based pulls. A manifest pull runs no dbt process in Cube — the artifact is produced by whatever dbt version your pipeline runs. The sandbox runs a pinned dbt Core version — currently 1.12.3 — together with the adapter for your deployment’s warehouse. To run a pull on a different version — to match the version your dbt project is built against — setDBT_SANDBOX_VERSION on the
deployment under Settings → Configuration:
- The value must be an exact, stable version:
1.9.2, notlatest,1.9,^1.9, or a prerelease such as1.9.2rc1. Any other value fails the pull immediately with a message naming the variable. - Cube doesn’t enforce a minimum version or check the one you pin against your warehouse adapter. A version the adapter can’t work with fails while the sandbox installs dependencies.
- Pinning a version other than the default installs dbt into a fresh environment on every pull instead of reusing Cube’s prebuilt one, so those pulls spend a few extra minutes installing dependencies.
Run a pull manually
Manual pulls from the Cube UI use the Git source. To upload a manifest, use the Cube CLI.Enter development mode
Open the pull dialog
Start the pull
Keep Cube in sync automatically
There are two ways to run this, and the difference is who commits the generated cubes:- Cube commits them — a sync creates a fresh review branch in your Cube data model, so a person can approve the update before it reaches production. Repository webhooks and Analytics Chat use this mode. Webhook syncs can skip the review branch when generated files are unchanged.
- Your CI commits them —
cube dbt generatewrites the cubes into your own working copy and commits nothing, so they go through your repository’s review, CODEOWNERS and branch protection like any other change.
Trigger from your CI/CD pipeline
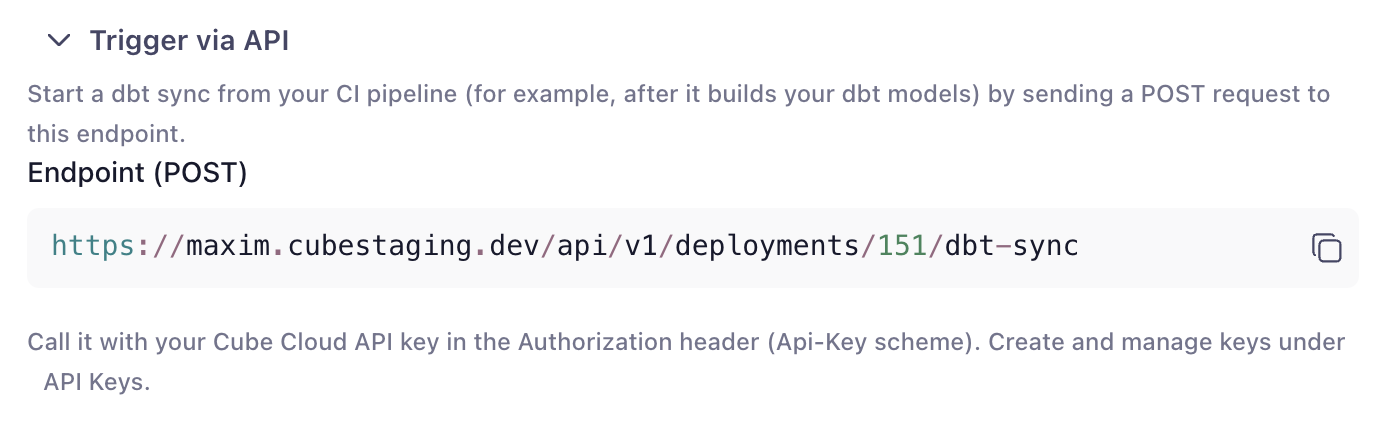
Cube exposes a REST endpoint you can call at the end of your dbt deployment pipeline, right afterdbt run or dbt build. As soon as your warehouse tables are rebuilt,
your pipeline can upload the target/manifest.json that command produced and tell Cube
to regenerate the matching cubes.
The dbt settings card shows the exact REST endpoint for your deployment if your
pipeline calls the API directly.
dbt parse. Use --manifest - to read the JSON from standard input. --wait exits
non-zero if the sync fails.
If Cube already has repository access and your job doesn’t have a manifest, run a
Git-based sync instead:
--ref syncs the branch being reviewed rather than the one saved on the integration.
It can’t be combined with --manifest. See dbt sync as a CI test
gate for a complete manifest-based pipeline,
including the compile and query steps.
Each sync creates a fresh review branch named dbt-sync/… off your deploy branch.
Pass --branch NAME (branchName in the API) to name it yourself; the branch must
not exist yet, so a name that is already taken fails the sync before anything runs.
Sync from an uploaded manifest
By default, a sync clones your dbt repository and runsdbt parse to produce a
manifest.json before converting it. If your CI pipeline already produces one —
via dbt parse, dbt compile, or dbt build — you can upload it directly and
skip the repository clone entirely:
jq (or an equivalent JSON tool) rather than interpolating the
file into a shell string — a real manifest.json is routinely tens of megabytes,
past what a shell accepts as a single argument, and --data-binary @- streams it
to curl instead of holding it in argv. The request body is capped at 50 MB.
This is useful when your platform policy won’t issue Cube a repository credential
(a PAT, deploy key, or GitHub App install), or simply to skip the clone, dependency
install, and dbt parse steps for a faster per-merge CI gate — Cube converts the
manifest you already validated, with no re-parse of a branch tip that may have
moved on. source defaults to git, so calls that omit it are unaffected.
Generate into your own repository
sync hands the generated cubes to Cube, which commits them to a review branch.
generate hands them back to you: Cube converts your manifest and the
Cube CLI writes the files into
your working copy, creating no branch and writing nothing to the Cube data model.
--out is the root of your data model project. The generated paths are
project-relative (model/cubes/dbt/…), so they land beneath it exactly as the
deployment’s Output path setting defines them — the CLI does not re-derive where
cubes belong. To put one run’s cubes somewhere else, pass --output-path (and
usually --name-prefix) — see Multiple dbt projects.
A complete job, with the manifest arriving as an artifact from the dbt pipeline rather
than from a dbt project checked out beside it:
generate still needs a deployment id and an API key: the conversion runs in Cube using
that deployment’s saved pull settings, which is what keeps
its output identical to a managed pull’s. It is the dbt repository Cube does not
need.--check. It compares the
generated cubes with what is committed and exits non-zero if any of them is missing or
differs, without writing:
--check walks the files the run generated, so it catches a cube that is out of date or
absent — but not one left behind by a dbt model that was deleted, which neither --check
nor the write path removes.
Because this variant commits nothing and creates no branch, the “dbt sync is ready for
review” notification never fires — which is what makes it usable on every pull request,
where a sync would mail your team once per run.
If you call the REST API directly instead of using the CLI, pass "output": "files" in
the dbt-sync request body — the default, "branch", commits as usual — then poll the
sync status and, once it reports COMPLETED, collect the files from
GET /api/v1/deployments/DEPLOYMENT_ID/dbt-sync/SYNC_JOB_ID/generated-files. Each item
carries a project-relative path and its content. They are held only briefly after
the sync finishes, so read them in the same job.
Trigger on every push
Register a webhook on your dbt repository so Cube syncs automatically whenever the tracked branch is updated. In the settings card, generate a signing secret and copy the callback URL into your Git host’s webhook settings. Pushes are verified by signature, de-duplicated (redeliveries and no-op ref changes are ignored), and scoped to the branch you’re syncing.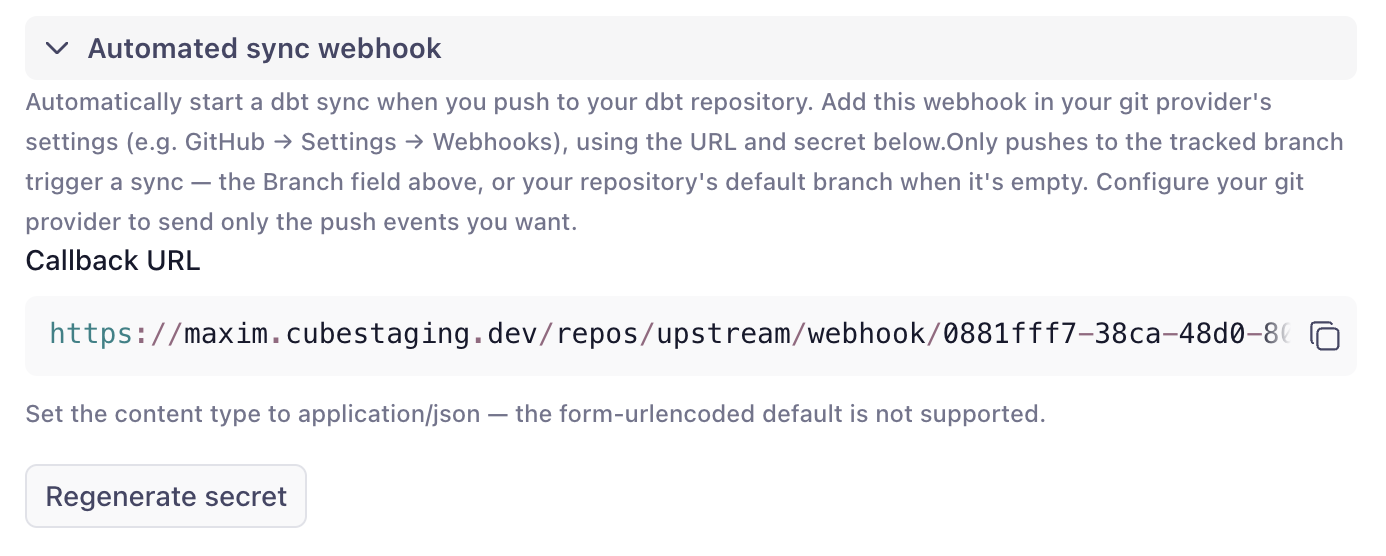
Skip unchanged webhook syncs
By default, each webhook sync creates a review branch even when the generated cube files are identical to those on your Cube data model’s default branch. To avoid empty reviews and their notification emails:- Go to Settings → Data Sources, edit the default data source, and expand dbt project.
- Expand Review notifications and enable Skip unchanged webhook syncs.
- Click Save dbt settings.
cube dbt generate or "output": "files") already creates no branch or notification.
Trigger from Analytics Chat
Ask the agent to check for and pull dbt updates — for example, “check for dbt updates and pull them.” The agent starts a sync, follows its progress, opens the review branch it produces, and summarizes the generated cubes. Ask “what happened with my recent dbt syncs?” to have it answer from sync history instead.Review notifications
When an automated sync produces a branch that’s ready to review, Cube emails the recipients you configure — a comma-separated list in the settings card — with a link straight to the review. No one has to poll the UI to notice that dbt changed. Recipients who can edit the data model land on the branch in development mode, ready to make changes; recipients without edit access see a read-only diff instead.Review sync history
Every sync appears in the deployment’s sync history, however it started: a manual pull, the CLI or API, a webhook, or the agent. To see the history, go to Settings → Data Sources, edit the default data source, expand dbt project, and expand Sync history. It lists the last 20 syncs, newest first. Each row shows:- Status — Running, Completed, Failed, Cancelled, or Unknown. Unknown means Cube could not determine the outcome of the sync. It does not mean that the sync failed.
- Trigger — Manual, API, Webhook, AI agent, or Unknown trigger.
- Branch — the Cube branch that the sync wrote the generated cubes to. It is empty when the sync wrote no branch, for example a webhook sync that found no changes.
- Start time and duration.
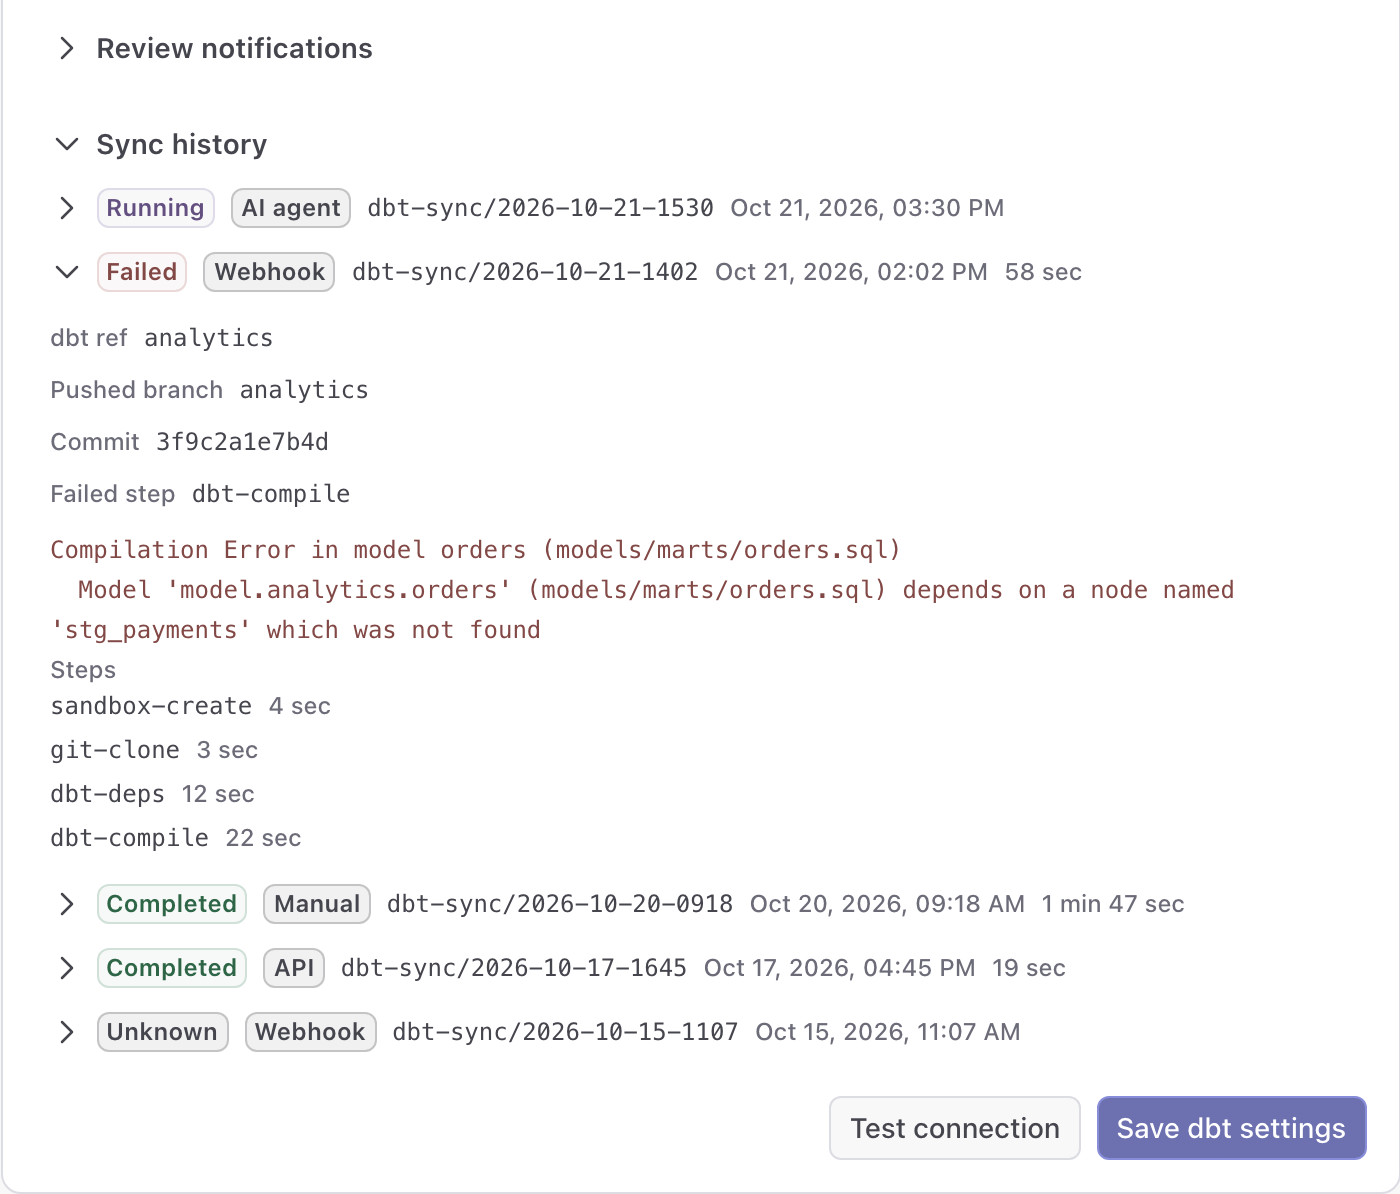
cube dbt history DEPLOYMENT_ID.
To see the details of one sync, run cube dbt logs DEPLOYMENT_ID SYNC_JOB_ID. See
sync history and logs in the CLI reference.
Multiple dbt projects
One deployment can hold cubes from several dbt projects. The saved integration describes one project — the one the Git source clones, webhooks watch, and manual pulls use — so bring each further project in as an uploaded manifest from that project’s own CI. Give every project its own output folder and its own name prefix on each run:- A folder per project keeps one project’s pull from deleting the other’s cubes. A pull deletes the files directly in its output folder that aren’t models of the manifest it converts, so two projects sharing a folder remove each other’s cubes on every run.
- A prefix per project keeps cube names unique across the data model. Projects often
share model names such as
stg_customers, and two cubes can’t have the same name. Letters, digits, and underscores, likesales_, keep cube and file names alike.
model/cubes/dbt leaves model/cubes/dbt/sales/ as
it is, and the reverse.
Each sync creates its own review branch. The branches change different folders, so they
merge in any order. With the REST API, send the same overrides as outputPath and
namePrefix in the dbt-sync request body. They apply to cube dbt generate and to
Git-based syncs too.
Keep in mind:
- Use the same folder and prefix on every run of a project. See Re-running a pull for what changing either one does.
- Every project goes through the deployment’s default data source. Generated cubes
don’t set
data_source, so the tables of all projects must be reachable through that connection.
What gets generated
dbt pull converts models, their columns, and their relationships. dbt metrics and semantic models are not imported. For each dbt model in your project:-
One cube is created (one
.ymlfile per model), named<name prefix><model name>with title<title prefix><model alias or name>. -
sql_tableis set to the model’s fully-qualified relation,database.schema.model(empty parts are dropped, so e.g. Postgres and Athena yieldschema.model). Theschemais taken per model from what dbt resolved for it, so a project whose models build into several schemas produces cubes pointing at several schemas — see Models in several schemas. On Databricks, the first segment is the catalog: the value of the deployment’sCUBEJS_DB_DATABRICKS_CATALOGenvironment variable, orhive_metastoreif it isn’t set. On ClickHouse, cubes also yieldschema.model: on ClickHouse a schema is a database, soCUBEJS_DB_NAMEdoesn’t affect the generatedsql_table(it still sets the connection’s default database). -
Each column becomes a dimension. The dimension type is inferred from the
column’s
data_typewhere available, then — if Infer column types from dbt catalog is enabled — from the warehouse type incatalog.json, and otherwise from the column name:Vendor spellings and parameters are normalized, soNUMBER(38,0),character varying(256),TIMESTAMP_NTZ(9),INT64, anddouble precisionall map as expected. - Model and column descriptions from your dbt project are carried over to the cubes and dimensions.
-
A
countmeasure is added to every cube. -
total_<column>sum measures are added for numeric columns whose names suggest an additive metric (names containingamount,price,cost,total, orvalue). -
Visibility (
public) comes frommeta.cube.publicin dbt, then from the Mark pulled cubes as public option — see Cube visibility. -
Primary keys are detected from dbt
primary_keyconstraints, thenunique+not_nulltests, then column-name suffixes — see Primary key detection. -
Joins between cubes are generated from dbt
relationshipstests and foreign-key constraints — so the generated data model is queryable across cubes out of the box. The foreign-key column is on the “many” side, so every generated join ismany_to_onefrom the cube that owns it. A dbt relationship describes the reference from the referencing side only, so nothing points back — enable Also generate reverse joins to emit aone_to_manyjoin back to the referencing cube too.
metricflow_time_spine and any non-model resources (sources, seeds,
snapshots, etc.) are skipped.
Each generated file begins with a header noting that it’s auto-generated and
recommending you don’t edit it by hand — see
Build on top of the generated cubes for
how to customize them instead.
Build on top of the generated cubes
Think of the resulting data model as layered. The generated cubes are the base layer, not the finished semantic layer:- The base layer — the cubes in the output path — is owned by the integration. It mirrors your dbt project and is regenerated on every pull, so treat it as read-only: any manual edits to these files are lost on the next sync.
- The customization layer is everything you build on top: hand-written cubes
that
extendsthe generated ones, and views that shape what’s exposed to consumers. This layer lives outside the output path and survives every pull.
extends merges your definitions into the generated cube, you can add
measures, joins, segments, pre-aggregations, or access control without touching
the generated files:
Re-running a pull
Pulling again refreshes the cubes to match your current dbt project:- Files for models that still exist in dbt are overwritten with freshly generated definitions.
- Files directly in the output folder whose models are no longer in the dbt project are deleted.
- Files directly in the output folder that correspond to a model still present in dbt are preserved — so a scoped pull (using a model selector or “Only pull marts”) will not delete the cubes for models outside that scope.
- Files in subfolders of the output folder, and everywhere else in the repository, are never touched — which is what lets several dbt projects pull into folders of their own.
Push cubes to dbt
dbt push is the reverse direction: it promotes a cube back into your dbt project as a reviewed pull request. A cube you built in Cube on an inlinesql: becomes a dbt model —
a <model>.sql plus a per-model <model>.yml properties file — validated by a real
dbt parse in Cube’s sandbox before the PR is opened, so the change arrives green.
This closes the modeling loop: prototype fast in Cube, then harden the logic in dbt where
it’s materialized, tested, and owned by analytics engineering. Once the pull request
merges, your existing pull picks the new model back up.
Before you push
- Write access to the dbt repository. Pull only needs read access; push needs a PAT with write scope, or an SSH deploy key registered with write access. Cube verifies this without pushing anything (see below).
- Push is off by default and enabled per deployment.
Enable push
Open the dbt settings
Turn push on and verify write access
git-receive-pack probe for a PAT, a
push --dry-run for SSH — without creating any branch or commit.Choose where models land and how they're delivered
Push a cube
Enter development mode
Open the push dialog
sql: are eligible; a cube
backed only by sql_table (nothing to materialize) or defined in JavaScript/Python is
reported as ineligible.Review the preview
<model>.sql and <model>.yml in an editable preview, along with
any conversion warnings. What you see is what ships — edit either file here if you need
to.Push
dbt deps + dbt parse. If parse fails,
the push stops with dbt’s own output and no pull request is opened. On success, a
progress toast ends with a link to the pull request — or, for SSH or non-GitHub/GitLab
hosts, a prefilled compare link to open it yourself.What gets pushed
Each push creates exactly two new files:<model>.sql— the cube’ssql:wrapped in a CTE that projects one column per dimension, so every column the properties file documents exists by construction. Table references that match a pulled dbt model are rewritten to{{ ref('<model>') }}, making the generated model a first-class node in your dbt DAG.<model>.yml— a per-model properties file: model and column descriptions,unique+not_nulltests on primary-key dimensions,relationshipstests synthesized from the cube’s joins (only to targets that originated in dbt), and the cube’s measures preserved undermeta.cube.measuresfor context.
Limitations
- Supported warehouses: Snowflake, Amazon Redshift, PostgreSQL, Google BigQuery, Databricks, Amazon Athena, and ClickHouse.
- Imports models, columns, and relationships only — not dbt metrics, semantic
models, or exposures. Data tests aren’t converted into anything either;
unique,not_null, andrelationshipstests are only read as evidence for primary keys and joins. - Pull is one-directional — dbt pull never writes back to your dbt repository. Promoting cubes into dbt is the dbt push direction (in preview).
- No model build — a pull doesn’t trigger a
dbt run; it assumes your tables are already built. An uploaded-manifest pull never connects to the warehouse. The only Cube-side warehouse connection is the Git source’s opt-in Infer column types from dbt catalog option (in preview), which runsdbt docs generateon Snowflake, Amazon Redshift, PostgreSQL, and ClickHouse. - One saved dbt integration per deployment. The Git source, webhooks, and manual pulls cover one dbt project. Further projects come in as uploaded manifests, each into its own folder — see Multiple dbt projects.
Troubleshooting
The pull dialog says the database type is unsupported
The pull dialog says the database type is unsupported
The pull dialog says dbt isn't configured
The pull dialog says dbt isn't configured
Test connection fails
Test connection fails
- Authentication failed — the token is invalid, expired, or lacks read access to the repository (for HTTPS), or the deploy key isn’t registered on the repository (for SSH). Generate a new read-scoped token, or register the public deploy key shown in the settings card.
- Repository not found — check the URL; for private repos this can also mean the credential can’t see the repo.
- Unsupported protocol — use the repository’s HTTPS or SSH clone URL.
- Host unreachable / could not resolve host — check the URL; the host must be reachable over the public internet.
A pull fails partway through
A pull fails partway through
- The dbt project doesn’t exist at the configured Project path (no
dbt_project.ymlthere). - A failure in the dbt project itself — the same failure you’d see running dbt locally.
The pull reports "no dbt models matched"
The pull reports "no dbt models matched"
dbt ls --select <your selector> locally.A webhook push doesn't trigger a sync
A webhook push doesn't trigger a sync
- The webhook is registered on the dbt repository with the callback URL and signing secret from the settings card.
- The push targets the branch configured in the dbt settings — pushes to other branches are ignored.
- The delivery isn’t a redelivery or a no-op ref change — those are de-duplicated and skipped.
A webhook sync completed but has no review branch or email
A webhook sync completed but has no review branch or email
cube dbt history DEPLOYMENT_ID --trigger webhook: an unchanged run has completed
status and no branch. If no matching run appears, follow
A webhook push doesn’t trigger a sync above.The pull succeeded but Playground returns no data
The pull succeeded but Playground returns no data
dbt run has materialized the
models, and that the schema each generated cube names is where they actually landed.
Open a generated .yml and compare its sql_table against your warehouse — if the
schema is wrong, see A generated cube points at the wrong table or schema below.A generated cube has no primary key, or the wrong one
A generated cube has no primary key, or the wrong one
- No key at all — the model has no
primary_keyconstraint, no strictunique+not_nullpair, and no column matching the configured suffixes. Either declare the key in dbt, or set Primary key column suffixes to your project’s convention (e.g._sk). - A declared key was ignored — a
primary_keyconstraint is applied all-or-nothing. If it names a column the model’scolumns:block doesn’t document, the whole declaration is skipped (rather than emitting a narrower, wrong grain) and the pull falls back to the guessing tiers. Check that every column the constraint lists is also documented undercolumns:. - Wrong column — declare the key in dbt and the pull will use it verbatim.
.yml to see what the pull decided: the key is whichever dimensions
carry primary_key: true. See Primary key detection.A query can't join two cubes in one direction
A query can't join two cubes in one direction
A generated cube points at the wrong table or schema
A generated cube points at the wrong table or schema
sql_table is whatever dbt resolved for that model, so start by asking which
schema dbt picked rather than which one you typed.Every cube points at the same schema, and it’s the value you put in dbt target
schema. Your project almost certainly overrides generate_schema_name and keys it
on the environment ({% if target.name == 'prod' %}), while the pull ran under the
default dev target — so every model took the macro’s fallback branch. Set dbt
target to your production target name and re-run the pull. See
Models in several schemas.Every cube points at <dbt target schema>_<something>. That’s dbt’s default
generate_schema_name, which appends a model’s custom schema to the target schema.
It’s working as dbt documents. If you want the bare custom names, override the macro
in your dbt project — Cube uses whatever your project resolves.One cube is wrong, the rest are fine. Check that model’s own +schema /
+database config in dbt.On Databricks, the catalog segment comes from the deployment’s
CUBEJS_DB_DATABRICKS_CATALOG environment variable and defaults to
hive_metastore. If your models live in a Unity Catalog catalog, set
CUBEJS_DB_DATABRICKS_CATALOG to that catalog so generated cubes point at it.